디자인 패턴
이 블로그에서는 디자인 패턴에 대한 설명과 함께 각 패턴의 장단점, 그리고 실제 코드 예제를 제공합니다.
Contents
- Strategy Pattern
- Adapter Pattern
- Template Method Pattern
- Factory Method Pattern
- Singleton Pattern
- Prototype Pattern
- Builder Pattern
- Abstract Factory Pattern
- Bridge Pattern
- Composite Pattern
- Decorator Pattern
- Visitor Pattern
- Observer Pattern
- Proxy Pattern
- Facade Pattern
- Command Pattern
- State Pattern
- Memento Pattern
- Mediator Pattern
- Flyweight Pattern
- Chain of Responsibility Pattern
- Interpreter Pattern
- Iterator Pattern
Strategy Pattern
여러 알고리즘을 하나의 추상적인 접근점(interface) 를 만들어, 접근점에서 서로 교환 가능하도록 하는 패턴
- 인터페이스
- 기능에 대한 선언과 구현 분리
public static void main(String[] args) {
    // AInterface 에서는 기능에 대한 선언만 적고,
    // AInterfaceImpl 에서는 인터페이서에 대한 구현체이다.
    AInterface aInterface = new AInterfaceImpl();
    aInterface.funcA();
}
- 델리게이트
- 특정 객체의 기능을 구현하기 위해, 다른 객체를 불러온다.
- 한 객체 기능을 다른 객체에 위임한다.
public class AObj {
  // 특정 기능에 대한 내용은 aInterface 에서 수행하도록 위임 (Delegate) 할 수 있다.
  AInterface aInterface = new AInterfaceImpl();

  private void funcAA() {
    System.out.println("AA");
    System.out.println("AAA");

    // ~ 기능이 필요합니다. 개발해주세요. (aInterface 에 Delegate 함)
    aInterface.funcA();
  }
}
Strategy Pattern 의 대표적인 예로, node 에 구현되어 있는 Passport.js 가 있다. 기능을 내포하는 Client 안에, 어떤 인증 Strategy 를 사용할 지 정해주면, (ex. JWT, Password) 함수의 내부 구현은 각각의 인증 Strategy 에 맞게 동작하게 된다.
Strategy Pattern 을 사용하게 되면, 또다른 Strategy 를 추가할 때 간단히 추가할 수 있는 장점이 있다.
// 공용 인터페이스
public interface Strategy {
    public boolean authenticate();
}
public class JWTStrategy {
    public boolean authenticate() {
        ...
    }
}
public class PasswordStrategy {
    public boolean authenticate() {
        ...
    }
}
// 실제 Strategy Pattern 을 사용할 Client
public class AuthService {
    private Strategy strategy;

    public void setStrategy(Strategy strategy) {
        // JWT or Password
        this.strategy = strategy;
    }
    public boolean authenticate() {
        if(this.strategy == null) {
            ...
        }
        // 실제 인증 과정은 개별의 Strategy 에 Delegate 한다.
        this.strategy.authenticate();
    }
}
회사에서 결제시스템을 구축하였을 때, 유저는 (카카오페이/네이버페이/신용카드/토스페이) 를 통해 결제할 수 있었다. 유저는 각각의 결제수단을 Strategy 로 설정해서 결제 로직을 구성했었다. (정확히 이것이 Strategy 패턴인지 몰랐는데, 이번에 이러한 전략이 있다는 것을 알게 되어서 신기했다.)
- 장점
- 새로운 전략을 추가하더라도 기존 코드를 변경하지 않는다. (Open-Closed Principle)
- 상속 대신 위임을 사용할 수 있다.
- 런타임에 전략을 변경할 수 있다.
- 단점
- 복잡도가 증가한다.
- 클라이언트 코드가 구체적인 전략을 알아야 한다.
Adapter Pattern
연관성 없는 두 객체를 연결해준다. 하나의 객체 파일에 변경을 가하지 않고, 추가 기능을 얹어서 사용하고 싶은 경우에 사용하면 좋다.
다음과 같은 간단한 클래스가 있다고 하자.
public class Math {
  public double twiceOf(double d) {
    return d*2;
  }
  public double halfOf(double d) {
    return d/2;
  }
}
위의 클래스는 double 에 대한 수학 연산을 할 수 있는 클래스이다. 하지만 만약 Float 를 반환하는 Math 클래스를 만들고 싶으면 다음과 같이 구현할 수 있다.
public class AdapterImpl implements Adapter {

  private Math math;

  public AdapterImpl() {
    this.math = new Math();
  }
  @Override
  public Float twiceOf(Float f) {
    return (float) this.math.twiceOf(f.doubleValue());
  }
  @Override
  public Float halfOf(Float f) {
    return (float) this.math.halfOf(f.doubleValue());
  }
}
위와 같이 구조를 잡을 경우, Math 파일의 기능이 변경되었을 때 (추가 기능이 추가되거나, 기존의 알고리즘이 변경되는 경우) Main 함수의 로직을 고치지 않고 AdapterImpl 클래스만 변경하고도 기능 변경을 이룰 수 있다는 장점이 있다. 왜냐하면 Adapter 라는 하나의 계층으로 묶여있기 때문이다. 하지만, 경우에 따라서는 불필요하게 Adapter 코드의 양이 늘어나게 된다는 단점이 있다.
Template Method Pattern
공통적인 프로세스를 묶어주기.
알고리즘의 구조를 메소드에 정의하고, 하위 클래스에서 알고리즘 구조의 변경없이 알고리즘을 재정의하는 패턴
- 구현하려는 알고리즘이 일정한 프로세스가 있을 때
- 구현하려는 알고리즘이 변경 가능성이 있을 때
- 크게는 동일한 비즈니스 로직(프로세스)을 사용하지만, 구체적인 구현부에 따라 코드의 내용은 달라질 때
사용 방법
- 알고리즘을 여러 단계로 나눈다.
- 나눠진 알고리즘의 단계를 메소드로 선언한다.
- 알고리즘을 수행할 템플릿 메소드를 만든다.
- 하위 클래스에서 나눠진 메소드들을 구현한다.
장점
- 템플릿 코드를 재사용하고 중복 코드를 줄일 수 있다.
- 템플릿 코드를 변경하지 않고 상속을 받아서 구체적인 알고리즘만 변경할 수 있다.
단점
- 리스코프 치환 원칙을 위반할 수도 있다. (상속을 받은 자식 클래스도, 부모 클래스의 의도에 맞게 로직을 수행해야 한다.)
- 알고리즘 구조가 복잡할수록 템플릿을 유지하기 어려워진다.
다음과 같은 요구사항이 있다고 가정하자.
신작 게임의 접속을 구현해주세요.
    - requestConnection(String str): String

유저가 게임 접속시 다음을 고려해야 합니다.
    1. 보안 과정 : 보안 관련 부분을 처리합니다.
        - doSecurity(String string): String
    2. 인증 과정 : username 과 password 가 일치하는지 체크합니다.
        - authentication(String id, String password): boolean
    3. 권한 과정 : 접속자가 유료 회원인지, 무료 회원인지, 게임 마스터인지 확인합니다.
        - authorization(String userName): int
    4. 접속 과정 : 접속자에게 커넥션 정보를 넘겨줍니다.
        - connection(String info): String
위의 케이스는 기능에 일관정인 프로세스로 잘 나누어진다. 템플릿 메소드를 통해 일단 위의 기능을 수행할 템플릿을 만들 수 있다.
public abstract class AbstGameConnectionHelper {
  protected abstract String doSecurity(String string);
  protected abstract boolean authentication(String id, String password);
  protected abstract int authorization(String username);
  protected abstract String connection(String info);

  // Template Method
  public String requestConnection(String encoded) {
    // 1. 보안 작업 -> 암호화 된 문자열을 디코드
    String decoded = doSecurity(encoded);

    String id = "id";
    String password = "password";

    // 2. 반환된 것을 가지고 아이디, 비밀번호를 할당한다.
    if(!authentication(id, password)) {
      throw new Error("암호, 아이디 불일치");
    }

    // 3. 권한을 부여한다.
    int auth = authorization(id);
    switch(auth) {
      // 게임 매니저
      case 0:
        break;
      // 일반 회원
      case 1:
        break;
      // 유료 회원
      case 2:
        break;
      default:
        break;
    }

    // 4. 유저의 연결 정보를 반환한다.
    return connection(id);
  }
}
템플릿 메소드가 완성되었으니, 이를 상속하는 하위 헬퍼 클래스를 만들 수 있다.
public class DefaultGameConnectionHelper extends AbstGameConnectionHelper {
  @Override
  protected String doSecurity(String string) {
    System.out.println("decode");
    return string;
  }

  @Override
  protected boolean authentication(String id, String password) {
    System.out.println("id, password check");
    return true;
  }

  @Override
  protected int authorization(String username) {
    System.out.println("check auth");
    return 0;
  }

  @Override
  protected String connection(String info) {
    System.out.println("connect");
    return "connect url";
  }
}
위의 헬퍼, 템플릿 메소드를 사용하는 부분에서는 다음과 같이 호출할 수 있다.
public static void main(String[] args) {
    AbstGameConnectionHelper helper = new DefaultGameConnectionHelper();
    helper.requestConnection("encoded info");
}
추가로, 만약 셧다운제 시행에 따라 10시 이후의 연결을 막아야 하는 상황이 왔다고 가정해 보자. 이 경우에, DefaultGameConnectHelper 의 doSecurity 함수에 시간, 나이 체크 로직을 추가하면 된다.
또한, 위에서는 DefualtGameConnectionHelper 클래스만 사용되었지만, 다른 종류의 연결 상황을 추가할 때에는 간단히 AbstGameConnectionHelper 클래스를 상속받은 다른 GameConnectionHelper 를 사용하면 된다. 이렇게 하면, 코드 중복이 감소되고, 추가적인 기능을 손쉽게 추가할 수 있다.
기타 helper class는 특정 클래스의 작업을 도와주는 역할을 하는 클래스로 유용한 기능들을 제공하며, 다른 helper class와는 의존하지 않습니다.
하지만 helper class의 helper라는 의미에 더 치중하면 좋습니다. helper class, helper function도 되기 때문입니다. 즉, 어떤 일을 도와주고 기능을 제공해주는 존재로 포괄적으로 생각하는 것이 좋습니다.
Factory Method Pattern
객체를 생성하는데, Template Method 처럼 일정한 방식의 절차가 필요할 때 많이 사용된다. 객체를 생성하는 역할을 특정한 클래스에 위임하지 않고, 추상화된 Factory Class 의 메소드를 사용한다.
다음과 같은 요구사항이 있다고 가정하자.
 게임 아이템과 아이템 생성을 구현해주세요.
     - 아이템을 생성하기 전에 DB 에서 아이템 정보를 불러옴
     - 아이템 생성 후, 데이터베이스에 아이템 생성 정보를 남기기
 아이템을 생성하는 주체를 ItemCreator 로 이름 짓기
 아이템은 item 이라는 Interface 로 구성한다.
     - Item 은 use 함수를 기본 함수로 가지고 있다.
다음과 같이 Factory Class 를 만들 수 있다.
public abstract class ItemCreator {
  // Template Method
  public Item create() {
    requestItemInfo();
    Item item = createItem();
    createItemLog();
    return item;
  }
  // DB 에서 아이템 정보 가져옴
  abstract protected void requestItemInfo();
  // 실제로 아이템을 생성해 줌
  abstract protected Item createItem();
  // 아이템 생성 후, 아이템 생성 로그를 남긴다.
  abstract protected void createItemLog();
}
그 후에, HP 포션, 마나 포션 아이템을 생성하는 팩토리를 만들 수 있다.
public class HpCreator extends ItemCreator {

  @Override
  protected void requestItemInfo() {
    System.out.println("Request HP DB Info");
  }

  @Override
  protected Item createItem() {
    return new HpPotion();
  }

  @Override
  protected void createItemLog() {
    System.out.println("Log HP Info");
  }
}
이러한 구조를 잡으면, 나중에 다른 아이템 종류를 추가할 때 손쉽게 추가할 수 있다. (마나포션을 추가할 때에 손쉽게 클래스 파일 하나만 추가하면 다른 코드에 영향이 없다.) 구조와 구현의 분리를 한다면, 이러한 이점을 공통적으로 가져갈 수 있게 된다.
Singleton Pattern
클래스가 하나의 인스턴스만 지니도록 강제한다.
public class Settings {
  private static Settings instance;

  private Settings() {}

  public static Settings getInstance() {
    if(instance == null) {
      instance = new Settings();
    }
    return instance;
  }
}
위의 코드를 통해 싱글톤을 구현할 수 있지만, 실제로 완벽한 싱글톤 패턴일까 ?
멀티쓰레드 환경에서, 위의 코드는 항상 싱글톤이 보장된다고 확신할 수는 없다. if(instance == null) 이 동시에 평가될 수 있기 때문이다.
1.
일단 synchronized 키워드를 이용하면, 멀티쓰레드 환경에서 thread-safe 한 로직을 구현할 수 있다. 하지만 synchronized 를 사용할 경우, 퍼포먼스 이슈가 있을 수 있다.
2.
이른 초기화 방법을 이요할 수 있다.
private static Settings instance = new Settings();
변수 선언과 동시에 instance 값을 초기화한다. instance 의 생성 비용이 적을 때 사용하면 좋다.
3.
public class Settings {
  private static volatile Settings instance;

  private Settings() {}

  public static Settings getInstance() {
    if(instance == null) {
        // instance 가 null 인 경우, synchronized lock 을 걸어서 thread-safe 한 환경을 구축한다.
        synchronized (Settings.class) {
          instance = new Settings();
        }
    }

    return instance;
  }
}
4.
public class Settings {

  private Settings() {}

  private static class SettingsHolder {
    private static final Settings INSTANCE = new Settings();
  }

  public static Settings getInstance() {
    return SettingsHolder.INSTANCE;
  }
}
Prototype Pattern
프로토타입 패턴을 이용하면, 복잡한 형태의(생산 비용이 높은) 인스턴스를 복사할 수 있다.
- 인스턴스 생산 비용이 높은 경우
- 종류가 너무 많아서 클래스로 정리되지 않는 경우
- 클래스로부터 인스턴스 생성이 어려운 경우
Java 에서는 기본적으로 Cloneable 이라는 인터페이스를 제공한다. clone 을 사용하려면 이 Cloneable 을 상속한 후 copy 를 구현해야 한다. (이렇게 복사된 값은 Deep Copy 가 이루어지게 된다.)
Builder Pattern
- 복잡한 단계가 필요한 인스턴스 생성을 빌드 패턴으로 구현한다.
- 복잡한 단계를 거쳐야 생성되는 객체의 구현을 서브 클래스에게 넘겨주는 패턴
컴퓨터를 스펙을 다루는 클래스가 있다고 하자. Computer.java 클래스를 생성하였고, 이를 외부에서 생성하려면 다음과 같이 객체를 생성해야 한다.
Computer computer = new Computer(...);
컴퓨터 객체에서 다루는 정보의 양이 많아질수록, 위부에서 호출하는 생성자의 길이는 점점 길어질 것이다. 그렇기 때문에, ComputerFactory 클래스를 만들어서 객체 생성을 도와준다.
Factory 에 넣을 Blueprint 를 통해서 구체적인 반환값을 얻을 수 있다.
public abstract class Blueprint {
  abstract public void setCpu();
  abstract public void setRam();
  abstract public void setStorage();
  abstract public Computer getComputer();
}

...

public class ComputerFactory {
  private Blueprint blueprint;

  public void make() {
    blueprint.setRam();
    blueprint.setCpu();
    blueprint.setStorage();
  }
  public Computer getComputer() {
    return blueprint.getComputer();
  }
  public void setBlueprint(Blueprint blueprint) {
    this.blueprint = blueprint;
  }
}

...

public class MacbookProBlueprint extends Blueprint {

  private Computer computer;

  public MacbookProBlueprint() {
    computer = new Computer("default", "default", "default");
  }
  @Override
  public void setCpu() {
    computer.setCpu("17");
  }
  @Override
  public void setRam() {
    computer.setRam("8g");
  }
  @Override
  public void setStorage() {
    computer.setStorage("256g");
  }
  @Override
  public Computer getComputer() {
    return computer;
  }
}
외부에서는 다음과 같이 Factory 를 사용할 수 있다.
ComputerFactory factory = new ComputerFactory();
factory.setBlueprint(new MacbookProBlueprint());
factory.make();
Computer computer = factory.getComputer();
많은 멤버 변수를 가지게 되면, 이러한 구조에도 불편함이 존재할 수 있다. 다음과 같은 구조로 정리하면, 더 깔끔한 구조로 가져갈 수 있다.
public class ComputerBuilder {
  private Computer computer;
  private ComputerBuilder() {
    computer = new Computer("default", "default", "default");
  }
  public static ComputerBuilder start() {
    return new ComputerBuilder();
  }
  public Computer build() {
    return computer;
  }
  public ComputerBuilder setRam(String ram) {
    computer.setRam(ram);
    return this;
  }
  public ComputerBuilder setCpu(String cpu) {
    computer.setCpu(cpu);
    return this;
  }
  public ComputerBuilder setStorage(String storage) {
    computer.setStorage(storage);
    return this;
  }
}

...

Computer computer = ComputerBuilder
                        .start()
                        .setCpu("i9")
                        .setRam("16g")
                        .setStorage("512")
                        .build();
Abstract Factory Pattern
관련 있는 객체의 생성 부분을 가상화 할 수 있다.
자전거를 만드는 Factory 를 구현해 보자. 아래와 같이 기본적인 BikeFactory 의 구조를 정의한 BikeFactory 인터페이스를 정의할 수 있다.
public interface BikeFactory {
  public Body createBody();
  public Wheel createWheel();
}
그리고, 이를 구현한 DefaultBikeFactory 를 구현한다
public class DefaultBikeFactory implements BikeFactory {
  @Override
  public Body createBody() {
    return new DefaultBody();
  }

  @Override
  public Wheel createWheel() {
    return new DefaultWheel();
  }
}
그리고, 경우에 따라서는 Factory 구현체를 반환해주는 클래스를 생성해 줄 수도 있다.
public class BikeFactoryInstance {
  public BikeFactory getFactory() {
    // 경우에 따라서 다른 BikeFactory 를 반환할 수 있다.
    return new DefaultBikeFactory();
  }
}
이런 패턴을 사용하면, 공통의 interface 로 묶인 다양한 객체들을 생성해볼 수 있다. 예를 들어, 같은 기능을 제공하는 Button 인터페이스를 선언하고, 각각의 종류로 나누어진 Button 구현 클래스들을 생성하여 사용할 수 있다.
- Factory Method Pattern 과 Abstract Factory Pattern 의 차이점
- | Factory Method Pattern | Abstract Factory Pattern | | --- | --- | | Factory 를 구현하는 방법 (inheritance) 에 초점을 둔다. | Factory 를 사용하는 방법 (composition) 에 초점을 둔다. | | 구체적인 객체 생성 과정을 구체적인 클래스로 옮기는 것이 목적이다. | 관련있는 여러 객체를 구체적인 클래스에 의존하지 않고 만들 수 있게 해준다. |
Bridge Pattern
기능과 구현을 분리한다. (실제로는 많이 사용되지는 않고, 어댑터 패턴과 유사한 면이 있다.)
먼저, 브릿지 패턴 없이는 다음과 같은 모스코드 출력 기능을 구현할 수 있다.
public class MorseCode {
  public void dot() {
    System.out.println(".");
  }

  public void dash() {
    System.out.println("-");
  }
  public void space() {
    System.out.println(" ");
  }
}

public class PrintMorseCode extends MorseCode {
  public PrintMorseCode a() {
    dot();
    dash();
    space();

    return this;
  }
  public PrintMorseCode b() {
    ...
    return this;
  }
}

...
// return this 를 통해 chaining 이 가능하다.
new PrintMorseCode().a().b().c()...
이러한 경우에, 만약 모스 부호를 System.out.println 이 아니라 소리 출력으로 바꿔야 한다면, MorseCode 클래스를 고치거나 새로 구현해야 한다. 아래와 같이 공통 interface 를 선언해 두면, 최소한의 코드 수정으로 해당 기능을 변경할 수 있다.
public interface MorseCodeFunction {
  public void dot();
  public void dash();
  public void space();
}
public class MorseCode {
  // Delegate 를 통해, MorseCodeFunction 클래스에게 dot, dash, space 기능을 위임할 수 있다.
  private MorseCodeFunction function;

  public MorseCode(MorseCodeFunction function) {
    this.function = function;
  }

  public void dot() {
    function.dot();
  }

  public void dash() {
    function.dash();
  }
  public void space() {
    function.space();
  }
}

public class PrintMorseCode extends MorseCode {
  public PrintMorseCode(MorseCodeFunction function) {
    super(function);
  }
  public void a() {
    dot();
    dash();
    space();
  }
  public void b() {

  }
}
Composite Pattern
컴포지트 패턴(Composite pattern)이란 객체들의 관계를 트리 구조로 구성하여 부분-전체 계층을 표현하는 패턴으로, 사용자가 단일 객체와 복합 객체 모두 동일하게 다루도록 한다.
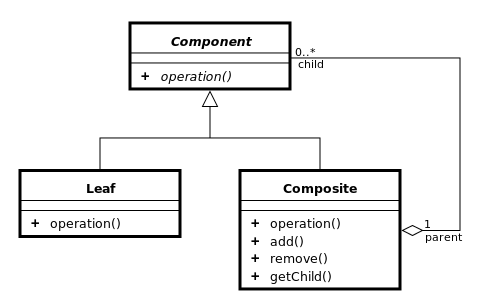
예시로, 아래와 같이 리눅스 파일 시스템을 만들어 볼 수 있다.
먼저 파일과 디렉토리의 공통 영역을 관할하는 Component 클래스를 다음과 같이 만들 수 있다.
abstract public class Component {

  private String name;

  public Component(String name) {
   this.name = name;
  }

  public String getName() {
    return name;
  }

  public void setName(String name) {
    this.name = name;
  }
}
그리고 파일과 디렉토리 클래스를 다음과 같이 구성한다.
public class File extends Component {
  private Object data;

  public File(String name) {
    super(name);
  }

  public Object getData() {
    return data;
  }

  public void setData(Object data) {
    this.data = data;
  }
}

...

public class Directory extends Component {

  List<Component> children = new ArrayList<>();

  public Directory(String name) {
    super(name);
  }

  public boolean addComponent(Component child) {
    return children.add(child);
  }

  public boolean removeComponent(Component child) {
    return children.remove(child);
  }
}
사용하는 클라이언트 코드에서는 다음과 같이 사용한다. 중요한 점은, Directory 와 File 이 모두 동일한 Component 인터페이스를 상속받았다는 사실이다. 계층은 다르지만 같은 인터페이스를 상속하게 만듦으로, 클라이언트단에서의 로직을 단순화시킬 수 있다.
Directory root = new Directory("root");
Directory usr = new Directory("usr");
Directory heej = new Directory("heej");
Directory picture = new Directory("picture");
Directory music = new Directory("music");

File pic1 = new File("pic1");
File music1 = new File("music1");
File music2 = new File("music2");

root.addComponent(home);
    home.addComponent(heej);
        heej.addComponent(music);
            music.addComponent(music1);
            music.addComponent(music2);
        heej.addComponent(picture);
            picture.addComonent(pic1);
Decorator Pattern
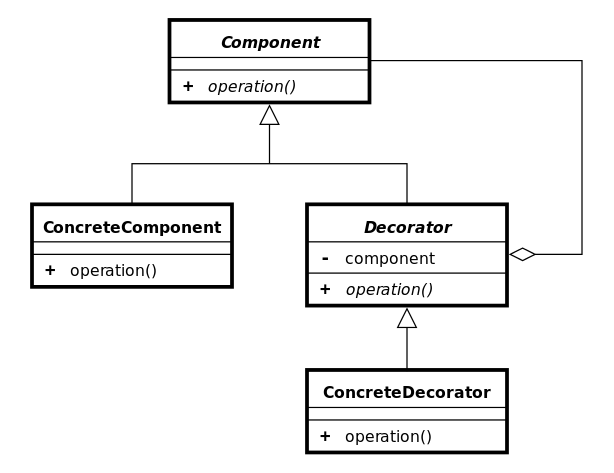
동적으로 책임 추가가 필요할 때, 데코레이터 패턴을 만들 수 있다. 주어진 상황 및 용도에 따라 어떤 객체에 책임을 덧붙이는 패턴으로, 기능 확장이 필요할 때 서브클래싱 대신 쓸 수 있는 유연한 대안이 될 수 있다.
커피 제조 방법을 예시로 구현해 볼 수 있다.
public interface CommentService {
    public void addComment(String comment);
}
...
public class CommentDecorator implements CommentService {

    private CommentService commentService;

    public CommentDecorator(CommentService commentService) {
        this.commentService = commentService;
    }

    @Override
    public void addComment(String comment) {
        System.out.println(comment);
    }
}
...
public class TrimmingDecorator extends CommentDecorator {
    public TrimmingDecorator(CommentService commentService) {
        super(commentService);
    }

    @Override
    public void addComment(String comment) {
        super.addComment(trim(comment));
    }

    private String trim(String comment) {
        return comment.replace("...", "");
    }
}
...
public class SpamFilteringCommentDecorator extends CommentDecorator {
    public SpamFilteringCommentDecorator(CommentService commentService) {
        super(commentService);
    }

    @Override
    public void addComment(String comment) {
        if(isNotSpam(comment)) {
            super.addComment(comment);
        }
    }

    private boolean isNotSpam(String comment) {
        return !comment.contains("http");
    }
}
...
public class App {

    private static boolean enableSpamFilter = true;
    private static boolean enableTrimming = true;

    public static void main(String[] args) {
        CommentService commentService = new DefaultCommentService();

        if(enableSpamFilter) {
            // Decorator 가 스팸 필터링 기능을 추가한다.
            commentService = new SpamFilteringCommentDecorator(commentService);
        }
        if(enableTrimming) {
            // Decorator 가 문자를 Trim 해주는 기능을 추가한다.
            commentService = new TrimmingDecorator(commentService);
        }

        Client client = new Client(commentService);
        client.writeComment("오징어게임");
        client.writeComment("없지...");
        client.writeComment("http://whiteship.org");
    }
}
Visitor Pattern
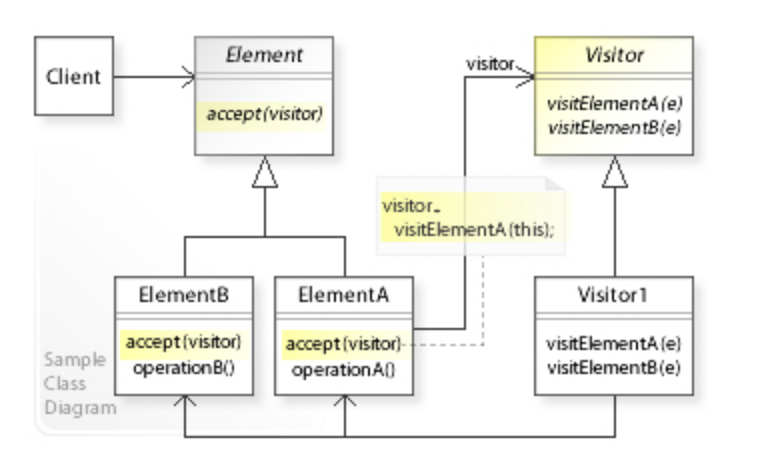
알고리즘을 객체 구조에서 분리시키는 디자인 패턴이다. 이렇게 분리를 하면 구조를 수정하지 않고도 실질적으로 새로운 동작을 기존의 객체 구조에 추가할 수 있게 된다. 개방-폐쇄 원칙 (Open-Closed Principle)을 적용하는 방법의 하나이다.
interface CarElementVisitor {
    void visit(Wheel wheel);
    void visit(Engine engine);
    void visit(Body body);
    void visit(Car car);
}

interface CarElement {
    void accept(CarElementVisitor visitor); // CarElements have to provide accept().
}

class Wheel implements CarElement {
    private String name;

    public Wheel(String name) {
        this.name = name;
    }

    public String getName() {
        return this.name;
    }

    public void accept(CarElementVisitor visitor) {
        visitor.visit(this);
    }
}

class Engine implements CarElement {
    public void accept(CarElementVisitor visitor) {
        visitor.visit(this);
    }
}

class Body implements CarElement {
    public void accept(CarElementVisitor visitor) {
        visitor.visit(this);
    }
}

class Car implements CarElement{
    CarElement[] elements;

    public CarElement[] getElements() {
        return elements.clone(); // Return a copy of the array of references.
    }

    public Car() {
        this.elements = new CarElement[]
          { new Wheel("front left"), new Wheel("front right"),
            new Wheel("back left") , new Wheel("back right"),
            new Body(), new Engine() };
    }

    public void accept(CarElementVisitor visitor) {
        for(CarElement element : this.getElements()) {
            element.accept(visitor);
        }
        visitor.visit(this);
    }
}

class CarElementPrintVisitor implements CarElementVisitor {
    public void visit(Wheel wheel) {
        System.out.println("Visiting "+ wheel.getName()
                            + " wheel");
    }

    public void visit(Engine engine) {
        System.out.println("Visiting engine");
    }

    public void visit(Body body) {
        System.out.println("Visiting body");
    }

    public void visit(Car car) {
        System.out.println("Visiting car");
    }
}

class CarElementDoVisitor implements CarElementVisitor {
    public void visit(Wheel wheel) {
        System.out.println("Kicking my "+ wheel.getName() + " wheel");
    }

    public void visit(Engine engine) {
        System.out.println("Starting my engine");
    }

    public void visit(Body body) {
        System.out.println("Moving my body");
    }

    public void visit(Car car) {
        System.out.println("Starting my car");
    }
}

public class VisitorDemo {
    static public void main(String[] args){
        Car car = new Car();
        car.accept(new CarElementPrintVisitor());
        car.accept(new CarElementDoVisitor());
    }
}
Observer Pattern
참고 자료 옵서버 패턴(observer pattern)은 객체의 상태 변화를 관찰하는 관찰자들, 즉 옵저버들의 목록을 객체에 등록하여 상태 변화가 있을 때마다 메서드 등을 통해 객체가 직접 목록의 각 옵저버에게 통지하도록 하는 디자인 패턴이다. 주로 분산 이벤트 핸들링 시스템을 구현하는 데 사용된다. 발행/구독 모델로 알려져 있기도 하다.
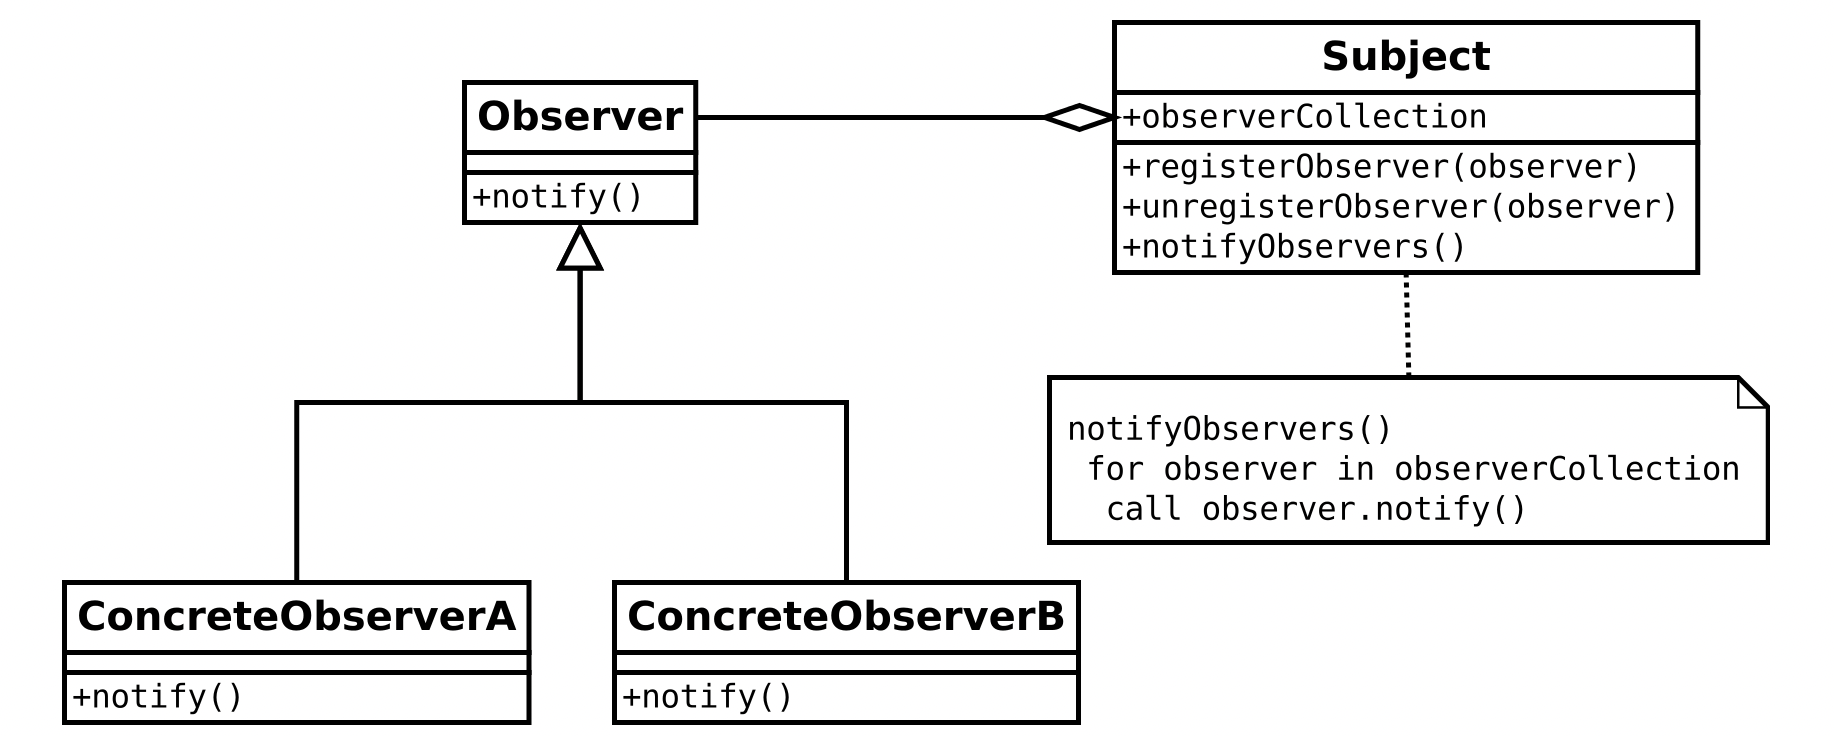
이벤트가 발생하면 각 옵저버는 콜백(callback)을 받는다. notify 함수는 관찰 대상이 발행한 메시지 이외에, 옵서버 자신이 생성한 인자값을 전달할 수도 있다.
각각의 파생 옵서버는 notify 함수를 구현함으로써 이벤트가 발생했을 때 처리할 각자의 동작을 정의해야 한다.
주체에는 일반적으로 등록(register), 제거(unregister) 메서드가 있는데, 전자는 새로운 옵저버를 목록에 등록하고 후자는 목록에서 옵저버를 뺀다. 등록과 제거 메서드 이외에도, 임시로 작동을 멈추거나 재개하는 메서드를 이용해 이벤트가 계속해서 있을 때 홍수같이 발생하는 요청을 제어할 수도 있다.
옵서버 패턴이 많이 쓰인 시스템에서는 순환 실행을 막는 메카니즘이 필요하다. 이벤트 X가 발생하면 옵저버A가 옵저버B를 갱신한다고 가정해보자. 그런데 옵저버B가 이 처리를 위해 옵저버A를 갱신한다면, 이는 다시 A로 하여금 이벤트 X를 발생하게 한다. 이같은 상황을 막기 위해 이벤트 X가 한번 처리된 후에는 A가 이벤트 X를 다시 발생시키지 않는 방법이 요구된다.
버튼의 OnClick Listener 의 기본 형태를 다음과 같이 구현할 수 있다.
public interface Observable {
  public void addObserver(Observer observer);
  public void removeObserver(Observer observer);
  public void notifyObservers();
}
public interface Observer {
  public void update();
}
...
public class Button implements Observable {

  List<Observer> observers = new ArrayList<>();

  public void click() {
    this.notifyObservers();
  }

  @Override
  public void addObserver(Observer observer) {
    this.observers.add(observer);
  }

  @Override
  public void removeObserver(Observer observer) {
    int index = this.observers.indexOf(observer);
    this.observers.remove(index);
  }

  @Override
  public void notifyObservers() {
    this.observers.stream().forEach((observer) -> observer.update());
  }

}
...
public class Main {
  public static void main(String[] args) {

    Button button = new Button();
    button.addObserver(new Observer(){
      @Override
      public void update() {
        System.out.println("Clicked");
      }
    });
    button.click();

    button.addObserver(new Observer(){
      @Override
      public void update() {
        System.out.println("Modal Open");
      }
    });
    button.click();
  }

}
아래는 흔히 소개되는 일기예보 예시이다.
public interface Subject {
    public void registerObserver(Observer o);
    public void removeObserver(Observer o);
    public void notifyObservers();
}
public interface Observer {
    public void update(float temp, float humidity, float pressure);
}


public class WeatherData implements Subject {
    private List<Observer> observers;
    private float temperature;
    private float humidity;
    private float pressure;

    public WeatherData() {
        observers = new ArrayList<Observer>();
    }

    public void registerObserver(Observer o) {
        observers.add(o);
    }

    public void removeObserver(Observer o) {
        observers.remove(o);
    }

    public void notifyObservers() {
        for (Observer observer : observers) {
            observer.update(temperature, humidity, pressure);
        }
}

...
public class CurrentConditionsDisplay implements Observer, DisplayElement {
    private float temperature;
    private float humidity;
    private WeatherData weatherData;

    public CurrentConditionsDisplay(WeatherData weatherData) {
        this.weatherData = weatherData;
        weatherData.registerObserver(this);
    }

    public void update(float temperature, float humidity, float pressure) {
        this.temperature = temperature;
        this.humidity = humidity;
        display();
    }

    public void display() {
        System.out.println("Current conditions: " + temperature
        + "F degrees and " + humidity + "% humidity");
    }
}
...

public class WeatherStation {

    public static void main(String[] args) {
        WeatherData weatherData = new WeatherData();

        CurrentConditionsDisplay currentDisplay =
            new CurrentConditionsDisplay(weatherData);
        StatisticsDisplay statisticsDisplay = new StatisticsDisplay(weatherData);
        ForecastDisplay forecastDisplay = new ForecastDisplay(weatherData);

        weatherData.setMeasurements(80, 65, 30.4f);
        weatherData.setMeasurements(82, 70, 29.2f);
        weatherData.setMeasurements(78, 90, 29.2f);

        weatherData.removeObserver(forecastDisplay);
        weatherData.setMeasurements(62, 90, 28.1f);
    }
}
채팅 서버를 예시로 다음과 같이 구현할 수도 있다.
public interface Subscriber {
    void handleMessage(String message);
}
...
public class User implements  Subscriber {
    private String name;

    public User(String name) {
        this.name = name;
    }
    public String getName() {
        return this.name;
    }
    @Override
    public void handleMessage(String message) {
        System.out.println(message);
    }
}
...
public class ChatServer {

    private Map<String, List<Subscriber>> subscribers = new HashMap<>();

    public void register(String subject, Subscriber subscriber) {
        if(subscribers.containsKey(subject)) {
            subscribers.get(subject).add(subscriber);
        } else {
            List<Subscriber> list = new ArrayList<>();
            list.add(subscriber);
            this.subscribers.put(subject, list);
        }
    }

    public void unregister(String subject, Subscriber subscriber) {
        if(subscribers.containsKey(subject)) {
            subscribers.get(subject).remove(subscriber);
        }
    }

    public void sendMessage(User user, String subject, String message) {
        if(subscribers.containsKey(subject)) {
            String userMessage = user.getName() + ": " + message;
            this.subscribers.get(subject).forEach(subscriber -> subscriber.handleMessage(userMessage));
        }
    }

}
...
public class Client {
    public static void main(String[] args) {
        ChatServer chatServer = new ChatServer();
        User user1 = new User("person1");
        User user2 = new User("person2");

        chatServer.register("디자인패턴", user1);
        chatServer.register("디자인패턴", user2);

        chatServer.register("타입스크립트", user1);

        chatServer.sendMessage(user1, "디자인패턴", "Hello World!");
    }
}
- 장점
- 상태를 변경하는 객체(publisher)와 변경을 감지하는 객체(subscriber)의 관계를 느슨하게 유지할 수 있다.
- Subject 의 상태 변경을 주기적으로 조회하지 않고 자동으로 감지할 수 있다.
- 런타임에 옵저버를 추가하거나 제거할 수 있다.
- 단점
- 복잡도가 증가한다.
- 다수의 Observer 객체를 등록 이후 해지하지 않으면, Memory Leak 가 발생할 수 있다.
java 에서는 기본적으로 Observable, Observer 클래스를 제공하고 있다. 하지만 Deprecated 되어있다고 확인된다.
Deprecated This class and the Observer interface have been deprecated. The event model supported by Observer and Observable is quite limited, the order of notifications delivered by Observable is unspecified, and state changes are not in one-for-one correspondence with notifications. For a richer event model, consider using the java.beans package. For reliable and ordered messaging among threads, consider using one of the concurrent data structures in the java.util.concurrent package. For reactive streams style programming, see the java.util.concurrent.Flow API.
Proxy Pattern
어떤 객체를 사용하고자 할때, 객체를 직접적으로 참조 하는것이 아니라, 해당 객체를 대행(대리, proxy)하는 객체를 통해 대상객체에 접근하는 방식을 사용하면 해당 객체가 메모리에 존재하지 않아도 기본적인 정보를 참조하거나 설정할 수 있고 또한 실제 객체의 기능이 반드시 필요한 시점까지 객체의 생성을 미룰 수 있다.
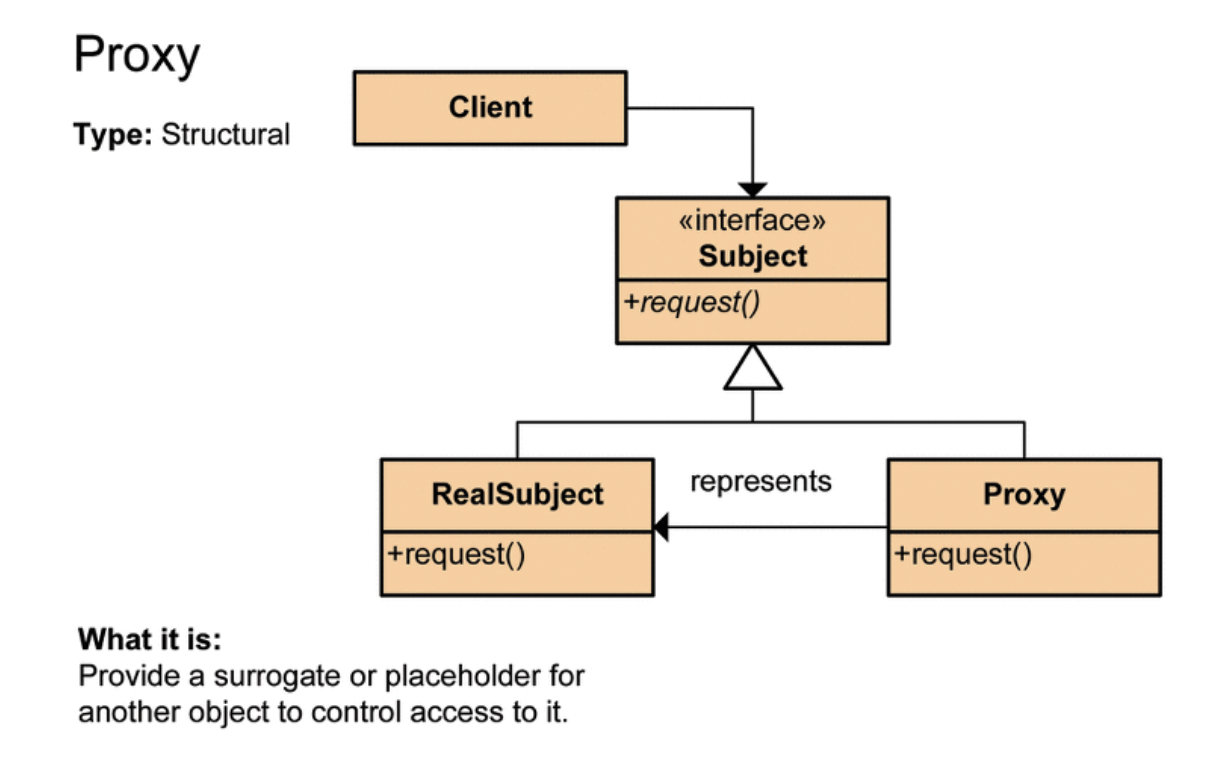
흔한 예로, 웹페이지를 볼 때 이미지를 제외한 HTML 들을 미리 랜더링하는 것에 대한 예를 들 수 있다. 이미지나 비디오를 제외한 리소스들은 빠르게 로드되지만, 이미지는 느리게 로드되기 때문이다. 아래와 같은 예로, 이미지 프록시를 생성할 수 있다.
interface Image {
    public void displayImage();
}

//on System A
class RealImage implements Image {
    private String filename;
    public RealImage(String filename) {
        this.filename = filename;
        loadImageFromDisk();
    }

    private void loadImageFromDisk() {
        System.out.println("Loading   " + filename);
    }

    @Override
    public void displayImage() {
        System.out.println("Displaying " + filename);
    }
}

//on System B
class ProxyImage implements Image {
    private String filename;
    private Image image;

    public ProxyImage(String filename) {
        this.filename = filename;
    }

    @Override
    public void displayImage() {
        if (image == null)
           image = new RealImage(filename);

        image.displayImage();
    }
}

class ProxyExample {
    public static void main(String[] args) {
        Image image1 = new ProxyImage("HiRes_10MB_Photo1");
        Image image2 = new ProxyImage("HiRes_10MB_Photo2");

        image1.displayImage(); // loading necessary
        image2.displayImage(); // loading necessary
    }
}
프록시 패턴 장점
- 사이즈가 큰 객체(ex : 이미지)가 로딩되기 전에도 프록시를 통해 참조를 할 수 있다.
- 실제 객체의 public, protected 메소드들을 숨기고 인터페이스를 통해 노출시킬 수 있다.
- 로컬에 있지 않고 떨어져 있는 객체를 사용할 수 있다.
- 원래 객체의 접근에 대해서 사전처리를 할 수 있다.
- 경우에 따라, 객체의 특정 리소스에 대한 접근을 막을 수 있다.
프록시 패턴 단점
- 객체를 생성할때 한단계를 거치게 되므로, 빈번한 객체 생성이 필요한 경우 성능이 저하될 수 있다.
- 프록시 내부에서 객체 생성을 위해 스레드가 생성, 동기화가 구현되야 하는 경우 성능이 저하될 수 있다.
- 로직이 난해해져 가독성이 떨어질 수 있다.
프록시 패턴은 Spring AOP 에서도 찾아볼 수 있다. 여러 코드에 흩어질 수 있는 기능들을 Aspect 로 정의하여, 한 군데에 모아서 구현할 수 있다. 이 경우에는 위의 예시와 달리, Dynamic Proxy 를 통해서 Bean 이 생성된다. Dynamic Proxy 는 컴파일 타임이 아니라, 런타임 단계에서 추가적인 기능이 탑재된 Bean 이 생성된다.
@Aspect
@Component
public class PerfAspect {
    // gameService 빈에 Aspect 적용
    @Around("bean(gameService)")
    public void timestamp(ProceedingJoinPoint point) throws Throwable {
        long before = System.currentTimeMillis();
        point.proceed();
        long after = System.currentTimeMillis();
        System.out.println(after - before);
    }
}
런타임에서, Spring 은 gameService 타입의 Dynamic Proxy Bean 을 등록하고, gameService 의 동작에 타이머 기능이 추가된 Service 로 바꾸어 준다.
Facade Pattern
복잡한 과정을 간단하게 표현할 수 있다. . 객체 지향 프로그래밍 분야에서 자주 쓰인다. Facade (외관)는 "건물의 정면"을 의미한다. 하나의 디자인 패턴으로 정의되어 있지만, 비교적 상식적인 수준에서 이해할 수 있는 패턴이다. 퍼사드는 클래스 라이브러리 같은 어떤 소프트웨어의 다른 커다란 코드 부분에 대한 간략화된 인터페이스를 제공하는 객체이다.
주로 복잡한 기술의 구현체들의 사용법을 숨기고, 간단하게 사용법을 바꾸고 싶을 때 사용한다.
- 퍼사드는 소프트웨어 라이브러리를 쉽게 사용할 수 있게 해준다. 또한 퍼사드는 소프트웨어 라이브러리를 쉽게 이해할 수 있게 해 준다. 퍼사드는 공통적인 작업에 대해 간편한 메소드들을 제공해준다.
- 퍼사드는 라이브러리를 사용하는 코드들을 좀 더 읽기 쉽게 해준다.
- 퍼사드는 라이브러리 바깥쪽의 코드가 라이브러리의 안쪽 코드에 의존하는 일을 감소시켜준다. 대부분의 바깥쪽의 코드가 퍼사드를 이용하기 때문에 시스템을 개발하는 데 있어 유연성이 향상된다.
- 퍼사드는 좋게 작성되지 않은 API의 집합을 하나의 좋게 작성된 API로 감싸준다.
- 래퍼(wrapper)가 특정 인터페이스를 준수해야 하며, 폴리모픽 기능을 지원해야 할 경우에는 어댑터 패턴을 쓴다. 단지, 쉽고 단순한 인터페이스를 이용하고 싶을 경우에는 퍼사드를 쓴다.
class CPU {
    public void freeze() { ... }
    public void jump(long position) { ... }
    public void execute() { ... }
}
class Memory {
    public void load(long position, byte[] data) {
    ...
    }
}
class HardDrive {
    public byte[] read(long lba, int size) {
    ...
    }
}

/* Façade */
class Computer {
    public void startComputer() {
        CPU cpu = new CPU();
        Memory memory = new Memory();
        HardDrive hardDrive = new HardDrive();
        cpu.freeze();
        memory.load(BOOT_ADDRESS, hardDrive.read(BOOT_SECTOR, SECTOR_SIZE));
        cpu.jump(BOOT_ADDRESS);
        cpu.execute();
    }
}

/* Client */
class Application {
    public static void main(String[] args) throws ParseException {
        // 원래는 사용하는 부분에서 구구절절 적어줘야 하는 부분인데, 퍼사드 패턴을 통해 startComputer() 함수로 추상화 시킬 수 있었다.
        Computer facade = /* grab a facade instance */;
        facade.startComputer();
    }
}
Command Pattern
커맨드 패턴은 객체의 행위( 메서드 )를 클래스로 만들어 캡슐화 하는 패턴입니다. 즉, 어떤 객체(Invoker)에서 다른 객체(Receiver)의 메서드를 실행하려면 그 객체(Receiver)를 참조하고 있어야 하는 의존성이 발생합니다.
그러나 커맨드 패턴을 적용하면, Invoker 와 Receiver 간의 의존성을 제거할 수 있습니다.
또한 기능이 수정되거나 변경이 일어날 때 A 클래스 코드를 수정없이 기능에 대한 클래스를 정의하면 되므로 시스템이 확장성이 있으면서 유연해집니다.
다음과 같은 Google Home 과 관련된 예시를 만들어 볼 수 있다.
public class Heater {
    public void powerOn(){
        System.out.println("Heater on");
    }
}

public class Lamp {
    public void turnOn(){
        System.out.println("Lamp on");
    }
}

public interface Command {
    public void run();
}

public class HeaterOnCommand implements Command{
    private Heater heater;

    public HeaterOnCommand(Heater heater){
        this.heater = heater;
    }

    public void run(){
        heater.powerOn();
    }
}

public class LampOnCommand implements Command{
    private Lamp lamp;

    public LampOnCommand(Lamp lamp){
        this.lamp = lamp;
    }

    public void run(){
        lamp.turnOn();
    }
}

public class OKGoogle {
    private Command command;

    public void setCommand(Command command){
        this.command = command;
    }

    public void talk(){
        command.run();
    }
}

...

public class Client {
    public static void main(String args[]){
        Heater heater = new Heater();
        Lamp lamp = new Lamp();

        Command heaterOnCommand = new HeaterOnCommand(heater);
        Command lampOnCommand = new LampOnCommand(lamp);
        OKGoogle okGoogle = new OKGoogle();

        // 히터를 켠다
        okGoogle.setCommand(heaterOnCommand);
        okGoogle.talk();

        // 램프를 켠다
        okGoogle.setCommand(lampOnCommand);
        okGoogle.talk();

    }
}
State Pattern
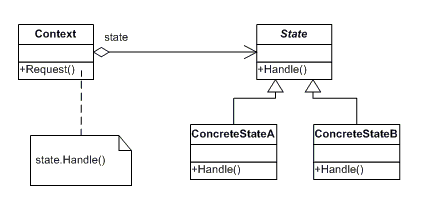 스테이트 패턴은 객체가 특정 상태에 따라 행위를 달리하는 상황에서,
자신이 직접 상태를 체크하여 상태에 따라 행위를 호출하지 않고,
상태를 객체화 하여 상태가 행동을 할 수 있도록 위임하는 패턴을 말한다.
State Pattern 은 Strategy Pattern 과 매우 유사한다 (실제로 UML 을 그려보면 동일하다). Strategy Pattern 은 비즈니스 로직을 경우에 따라 변경해 주는 것이고, State Pattern 은 Event 에 따라 객체의 상태가 동적으로 변경될 때 사용한다.
Laptop 의 전원 상태를 관리하는 예시를 구현해볼 수 있다.
// 먼저 전원 상태를 캡슐화한 인터페이스를 선언합니다.
public interface PowerState {
    public void powerPush();
}
// 다음으로 PowerState 인터페이스를 구현한 각 상태 클래스를 정의합니다.
public class On implements PowerState{
    public void powerPush(){
        System.out.println("전원 off");
    }
}

public class Off implements PowerState {
    public void powerPush(){
        System.out.println("절전 모드");
    }
}

public class Saving implements PowerState {
    public void powerPush(){
        System.out.println("전원 on");
    }
}
// Laptop 클래스를 구현합니다.
public class Laptop {
    private PowerState powerState;

    public Laptop(){
        this.powerState = new Off();
    }

    public void setPowerState(PowerState powerState){
        this.powerState = powerState;
    }

    public void powerPush(){
        powerState.powerPush();
    }
}
...
public class Client {
    public static void main(String args[]){
        Laptop laptop = new Laptop();
        On on = new On();
        Off off = new Off();
        Saving saving = new Saving();

        laptop.powerPush();
        laptop.setPowerState(on);
        laptop.powerPush();
        laptop.setPowerState(saving);
        laptop.powerPush();
        laptop.setPowerState(off);
        laptop.powerPush();
        laptop.setPowerState(on);
        laptop.powerPush();
    }
}
주문 환불의 로직을 작성하는 경우, 주문 상태에 따라서 처리되어야 할 로직이 매우 다를 수 있다. 이러한 경우에, State Pattern 을 통해 수많은 if-else 구문들을 제거할 수 있다. 또한 if-else 코드가 많은 코드를 테스트하는 것도 까다로우므로, 이러한 케이스는 State 패턴을 적용시키기에 적합하다.
Memento Pattern
메멘토 패턴은 객체의 상태 정보를 저장하고 사용자의 필요에 의하여 원하는 시점의 데이터를 복원 할 수 있는 패턴을 의미한다.
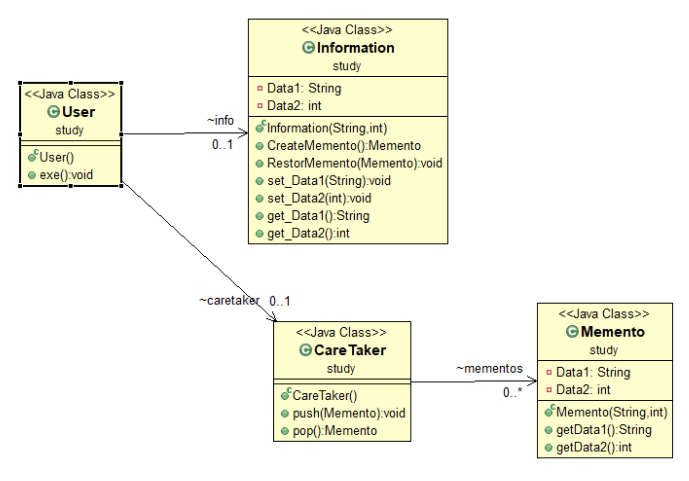
먼저 Memento 는 저장할 데이터를 저장할 공간을 의미한다.
public class Memento {
  private String state;
  // 허용한 클래스에서만 생성될 수 있도록 protected 사용
  protected Memento(String state) {
    this.state = state;
  }

  public String getState() {
    return state;
  }

  public void setState(String state) {
    this.state = state;
  }

}
Originater 은 실제로 변하는 데이터를 담을 객체를 의미한다.
public class Originator {

  String state;

  public Memento createMemento() {
    return new Memento(state);
  }
  public void restoreMemento(Memento memento) {
    this.state = memento.getState();
  }
}
위를 사용하는 코드에서는 다음과 같이 사용할 수 있다.
public class Main {
  public static void main(String[] args) {
    Stack<Memento> mementos = new Stack<>();

    Originator originator = new Originator();

    originator.setState("1");
    mementos.push(originator.createMemento());
    originator.setState("2");
    mementos.push(originator.createMemento());
    originator.setState("3");
    mementos.push(originator.createMemento());
    originator.setState("4");
    mementos.push(originator.createMemento());

    // 바로 지난 번 상태로 롤백시킬 수 있다.
    originator.restoreMemento(mementos.pop());
  }
}
또다른 예시로, 간단한 게임 점수를 임시로 저장하는 코드를 살펴보자.
public class Game {
    private int redTeamScore;
    private int blueTeamScore;

    public int getRedTeamScore() {
        return this.redTeamScore;
    }
    public void setRedTeamScore(int redTeamScore) {
        this.redTeamScore = redTeamScore;
    }
    public int getBlueTeamScore() {
        return this.blueTeamScore;
    }
    public void setBlueTeamScore(int blueTeamScore) {
        this.blueTeamScore = blueTeamScore;
    }
}
...
public class Client {
    public static void main(String[] args) {
        Game game = new Game();
        game.setBlueTeamScore(10);
        game.setRedTeamScore(20);

        int blueTeamScore = game.getBlueTeamScore();
        int redTeamScore = game.getRedTeamScore();

        Game restoredGame = new Game();
        restoredGame.setBlueTeamScore(blueTeamScore);
        restoredGame.setRedTeamScore(redTeamScore);
    }
}
이러한 코드에서는 Client 의 코드가 Game 의 구체적인 속성을 모두 알고있어야 유지보수가 가능하다. 이러한 코드를 Memento 와 Originator 로 나누면, 다음과 같이 간결하게 리팩토링 할 수 있다. 중요한 점은, memento 의 역할을 하는 객체는 immutable 해야 한다.
public class GameSave {
    private final int blueTeamScore;
    private final int redTeamScore;

    public GameSave(int blueTeamScore, int redTeamScore) {
        this.blueTeamScore = blueTeamScore;
        this.redTeamScore = redTeamScore;
    }

    public int getBlueTeamScore() {
        return blueTeamScore;
    }

    public int getRedTeamScore() {
        return redTeamScore;
    }
}
...
public class Client {
    public static void main(String[] args) {
        Game game = new Game();
        game.setBlueTeamScore(10);
        game.setRedTeamScore(20);

        GameSave gameSave = game.save();

        game.setBlueTeamScore(12);
        game.setRedTeamScore(22);
        // Game 내부의 속성을 숨기고, 유연하게 코드를 바꿀 수 있다.
        game.restore(gameSave);
    }
}
Mediator Pattern
중재자 패턴(mediator pattern), 조정자 패턴은 소프트웨어 공학에서 어떻게 객체들의 집합이 상호작용하는지를 함축해놓은 객체를 정의한다. 이 패턴은 프로그램의 실행 행위를 변경할 수 있기 때문에 행위 패턴으로 간주된다. 중재자 패턴을 사용하면 객체 간 통신은 중재자 객체 안에 함축된다. 객체들은 더 이상 다른 객체와 서로 직접 통신하지 않으며 대신 중재자를 통해 통신한다. 이를 통해 통신 객체 간 의존성을 줄일 수 있으므로 결합도를 감소시킨다.
목적
- 서로 상호작용하는 object들을 캡슐화함으로써 loose coupling을 유지하기 위해 사용한다.
사용 패턴
- 객체들 사이에 너무 많은 관계가 얽혀있을때
- 객체들 사이의 상호작용 관계가 복잡할때
예를 들어, 과거에는 친구들끼리 약속을 잡을 때 1명씩 문자를 보내서 약속시간을 조정해야 했다. 하지만 단톡방을 이용한다면(매개체가 있다면), 한 번에 여려 친구들과 통신할 수 있으므로 커뮤니케이션 비용을 없앨 수 있다.

서로가 이벤트를 전달해 준다는 측면에서는 Observer Pattern 과 비슷한 것 같다. Observer 패턴과의 차이점은 다음과 같다. Observer : 재사용성이 좋다. 복잡한 communication에서는 이해하기 힘들다. 1개의 Publisher와 N개의 Subscriber로 이루어져 있다. Mediator : 재사용성이 안좋다. 복잡한 communication에서 이해하기 쉽다. M개의 Publisher, N개의 Subscriber 사이의 communication을 1개의 Mediator를 이용해 캡슐화하고 있다.
아래는 위의 예시를 설명하는 간단한 채팅 프로그램을 구현한 것이다.
import java.util.ArrayList;
import java.util.List;

public abstract class Mediator {
  // 이벤트를 전달받을 객체들을 저장한다.
  protected List<Colleague> colleagues = new ArrayList<>();

  public boolean addColleague(Colleague colleague) {
    if(colleague == null) {
      return false;
    }
    return this.colleagues.add(colleague);
  }
  // 이벤트를 전달해 주는 함수. 구현부는 Concrete class 에서 구현한다.
  public abstract void mediate(String data);

}

...

public abstract class Colleague {
  private Mediator mediator;

  public boolean join(Mediator mediator) {
    this.mediator = mediator;
    return mediator.addColleague(this);
  }
  // Mediator 에 이벤트를 전달한다.
  public void sendData(String data) {
    if(mediator != null) {
      mediator.mediate(data);
    }
  }
  // Mediator 으로부터 이벤트를 전달받으면, 실행되는 함수.
  // Concrete class 에서 구현한다.
  abstract void handle(String data);
}
구현체 (Concrete Class) 는 아래와 같이 구현할 수 있다.
public class ChatMediator extends Mediator {

  @Override
  public void mediate(String data) {
    // Mediator 의 colleague 들에게 메세지를 전달한다.
    for(Colleague colleague: colleagues) {
      colleague.handle(data);
    }
  }

}

...

public class ChatColleague extends Colleague {

  @Override
  void handle(String data) {
    // Mediator 으로부터 받은 데이터를 처리한다.
    System.out.println(data);
  }

}
실행하는 쪽에서는 다음과 같이 사용된다.
public class Main {
  public static void main(String[] args) {
    Mediator mediator = new ChatMediator();

    Colleague colleague1 = new ChatColleague();
    Colleague colleague2 = new ChatColleague();
    Colleague colleague3 = new ChatColleague();

    colleague1.join(mediator);
    colleague2.join(mediator);
    colleague3.join(mediator);

    colleague1.sendData("AAA");
    colleague2.sendData("BBB");
    colleague3.sendData("CCC");
  }
}
/*
    실행 결과
    AAA
    AAA
    AAA
    BBB
    BBB
    BBB
    CCC
    CCC
    CCC
*/
Mediator 패턴은 이러한 방법 외에도, 대리수행자 의 개념으로 사용할 수 있다. 코드를 깔끔히 남기고 싶은 부분과, 복잡한 구현체들을 분리하고 싶은 경우, 복잡한 코드들을 Mediator 에 몰아서 구현하면, 코드를 깔끔하기 관리할 수 있다.
스프링의 DispatcherServlet 을 Mediator 패턴의 예시로 들 수 있다. ThemeResolver, HandlerMapping, HandlerAdapter, RequestToViewNameTranslator 등 많은 복잡한 Colleague 들이 DispatcherServlet 을 통해 요청을 처리한다.
Flyweight Pattern
플라이웨이트급 선수들처럼, 메모리를 가볍게 관리한다. Flyweight pattern은 비용이 큰 자원을 공통으로 사용할 수 있도록 만드는 패턴이다.
비용이 크다는 것은 두 가지로 나누어 생각할 수 있다.
중복 생성될 가능성이 높은 경우 동일한 자원이 자주 사용될 가능성이 높은 경우이다. 이런 자원은 공통 자원 형태로 관리하고 요청이 있을 때 제공해주는 것이 좋다.
자원 생성 비용은 큰데 사용빈도가 낮은 경우 자주 생성하지 않는 데 사용빈도가 낮은 자원을 항상 생성하는 것은 낭비
즉 , 생성된 객체를 생성한 후 저장하여 재활용하는 팩토리를 기반으로 한다. 객체가 요청될 때마다 팩토리는 객체가 이미 생성되었는지 확인하기 위해 객체를 찾는다. 있는 경우 기존 오브젝트가 리턴되고, 그렇지 않으면 새 오브젝트가 작성, 저장 및 리턴된다.
class Flyweight{
    Map<String, Subject> map = new HashMap<String, Subject>();

    public Subject getSubject(String name){
        Subject subject = map.get(name);

        if(subject == null){
            subject = new Subject(name);
            map.put(name, subject);
        }

        return subject;
    }
}


class Subject{
    private String name;

    public Subject(String name){
        this.name = name;
        System.out.println("create : " + name);
    }
}
Chain of Responsibility Pattern
객체 지향 디자인에서 chain-of-responsibility pattern은 명령 객체와 일련의 처리 객체를 포함하는 디자인 패턴이다. 각각의 처리 객체는 명령 객체를 처리할 수 있는 연산의 집합이고, 체인 안의 처리 객체가 핸들할 수 없는 명령은 다음 처리 객체로 넘겨진다. 이 작동방식은 새로운 처리 객체부터 체인의 끝까지 다시 반복된다.
표준 책임 연쇄 모델이 변화하면서, 어떤 처리 방식에서는 다양한 방향으로 명령을 보내 책임을 트리 형태로 바꾸는 관제사 역할을 하기도 한다. 몇몇 경우에서는, 처리 객체가 상위의 처리 객체와 명령을 호출하여 작은 파트의 문제를 해결하기 위해 재귀적으로 실행된다. 이 경우 재귀는 명령이 처리되거나 모든 트리가 탐색될때까지 진행되게 된다. XML(파싱되었으나 실행되지 않은) 인터프리터가 한 예이다.
어떠한 로직을 처리할 수 있는 객체들이 있을 때, 순서대로 한 객체씩 일을 처리하도록 시도해보고, 실패하면 다음 객체에게 넘겨주는 형태이다. 아래의 예시는, 하나의 로거를 간단히 구현해 본 예제이다. StdoutLogger -> EmailLogger -> StderrLogger 가 각각 자신의 Logging Level 에 맞는다면 출력하고, 맞지 않다면 다음 로거에게 넘기는 예제이다.
abstract class Logger {
    public static int ERR = 3;
    public static int NOTICE = 5;
    public static int DEBUG = 7;
    protected int mask;

    // The next element in the chain of responsibility
    protected Logger next;

    public Logger setNext(Logger log) {
        next = log;
        return log;
    }

    public void message(String msg, int priority) {
        if (priority <= mask) {
            writeMessage(msg);
        }
        if (next != null) {
            next.message(msg, priority);
        }
    }

    abstract protected void writeMessage(String msg);
}

class StdoutLogger extends Logger {
    public StdoutLogger(int mask) {
        this.mask = mask;
    }

    protected void writeMessage(String msg) {
        System.out.println("Writing to stdout: " + msg);
    }
}


class EmailLogger extends Logger {
    public EmailLogger(int mask) {
        this.mask = mask;
    }

    protected void writeMessage(String msg) {
        System.out.println("Sending via email: " + msg);
    }
}

class StderrLogger extends Logger {
    public StderrLogger(int mask) {
        this.mask = mask;
    }

    protected void writeMessage(String msg) {
        System.err.println("Sending to stderr: " + msg);
    }
}

public class ChainOfResponsibilityExample {
    public static void main(String[] args) {
        // Build the chain of responsibility
        Logger logger, logger1;
        logger1 = logger = new StdoutLogger(Logger.DEBUG);
        logger1 = logger1.setNext(new EmailLogger(Logger.NOTICE));
        logger1 = logger1.setNext(new StderrLogger(Logger.ERR));

        // Handled by StdoutLogger
        logger.message("Entering function y.", Logger.DEBUG);

        // Handled by StdoutLogger and EmailLogger
        logger.message("Step1 completed.", Logger.NOTICE);

        // Handled by all three loggers
        logger.message("An error has occurred.", Logger.ERR);
    }
}
Spring 에서는 Servlet Filter 들이 Request 를 전처리하는 과정에서 Chain Of Responsibility 원칙이 적용되어 있다. Filter 들의 순서에 따라 Request 의 동작이 달라지게 된다.
Interpreter Pattern
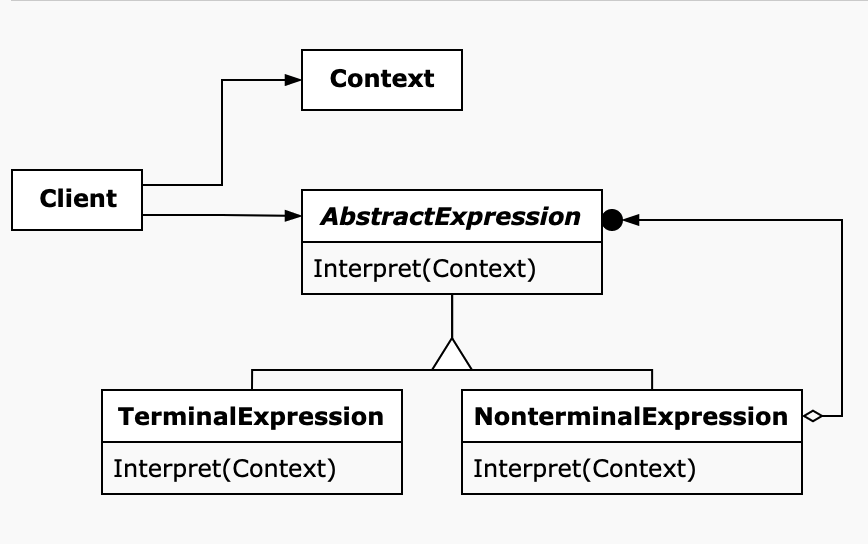 자주 해결해야 하는 문제/패턴들에 대해, 일종의 문법으로 정의하고 특정 문법에 맞는 표현식을 작성하여 문제를 해결하는 방법이다. 예를 들어, 각 언어에 존재하는 정규 표현식이 Interpreter Pattern 의 예시가 될 수 있다.
예를 들어, 다음과 같은
 PostFix 연산 클래스가 있다고 가정하자. 예를 들어, 32+는 5가 나오게 된다.
public class PostfixNotation {
  private final String expression;

  public PostfixNotation(String expression) {
    this.expression = expression;
  }

  private void calculate() {
    Stack<Integer> numbers = new Stack<>();

    for(char c : this.expression.toCharArray()) {
      switch (c) {
        case '+':
          numbers.push(numbers.pop() + numbers.pop());
          break;
        case '-':
          int right = numbers.pop();
          int left = numbers.pop();
          numbers.push(left - right);
          break;
        default:
          numbers.push(Integer.parseInt(c + ""));
      }
    }
    System.out.println(numbers.pop());
  }
}
이러한 상황에서, 더 확장적으로 쓰기 위해 다음과 같이 표현식을 설계할 수 있다. 아래와 같이 기능을 구현하면, 새로운 곱셈, 나눗셈이 추가되어도 기능을 확장하는 방식으로 구현할 수 있다. (Open-Closed Principle)
public class App {
    public static void main(String[] args) {
        PostfixExpression expression = PostfixParser.parse("xyz+-");

        int result = expression.interpret(Map.of('x', 1, 'y', 2, 'z', 3));

        System.out.println(result);
    }
}
...
public class VariableExpression implements PostfixExpression {

    private Character variable;

    public VariableExpression(Character variable) {
        this.variable = variable;
    }

    @Override
    public int interpret(Map<Character, Integer> context) {
        return context.get(variable);
    }
}
...
public class PlusExpression implements PostfixExpression {

    private PostfixExpression left, right;

    public PlusExpression(PostfixExpression left, PostfixExpression right) {
        this.left = left;
        this.right = right;
    }

    @Override
    public int interpret(Map<Character, Integer> context) {
        return left.interpret(context) + right.interpret(context);
    }
}
...
public class MinusExpression implements PostfixExpression {
    private PostfixExpression left, right;
    public MinusExpression(PostfixExpression left, PostfixExpression right) {
        this.left = left;
        this.right = right;
    }

    @Override
    public int interpret(Map<Character, Integer> context) {
        return context.get(left) - context.get(right);
    }
}
Interpreter 패턴을 사용하면 코드의 복잡도가 올라간다. 이 디자인 패턴을 사용할 만큼 자주 사용되는 기능인지 충분히 검토한 후에, Interpreter 패턴으로 사용해야 한다.
Iterator Pattern
Iterator 패턴은 집합 객체의 내부를 노출시키지 않고, 해당 집합 객체를 순회하는 디자인 패턴이다. Java 에 기본적으로 내장되어 있는 Iterator 인터페이스도 Iterator 패턴의 예제가 된다.
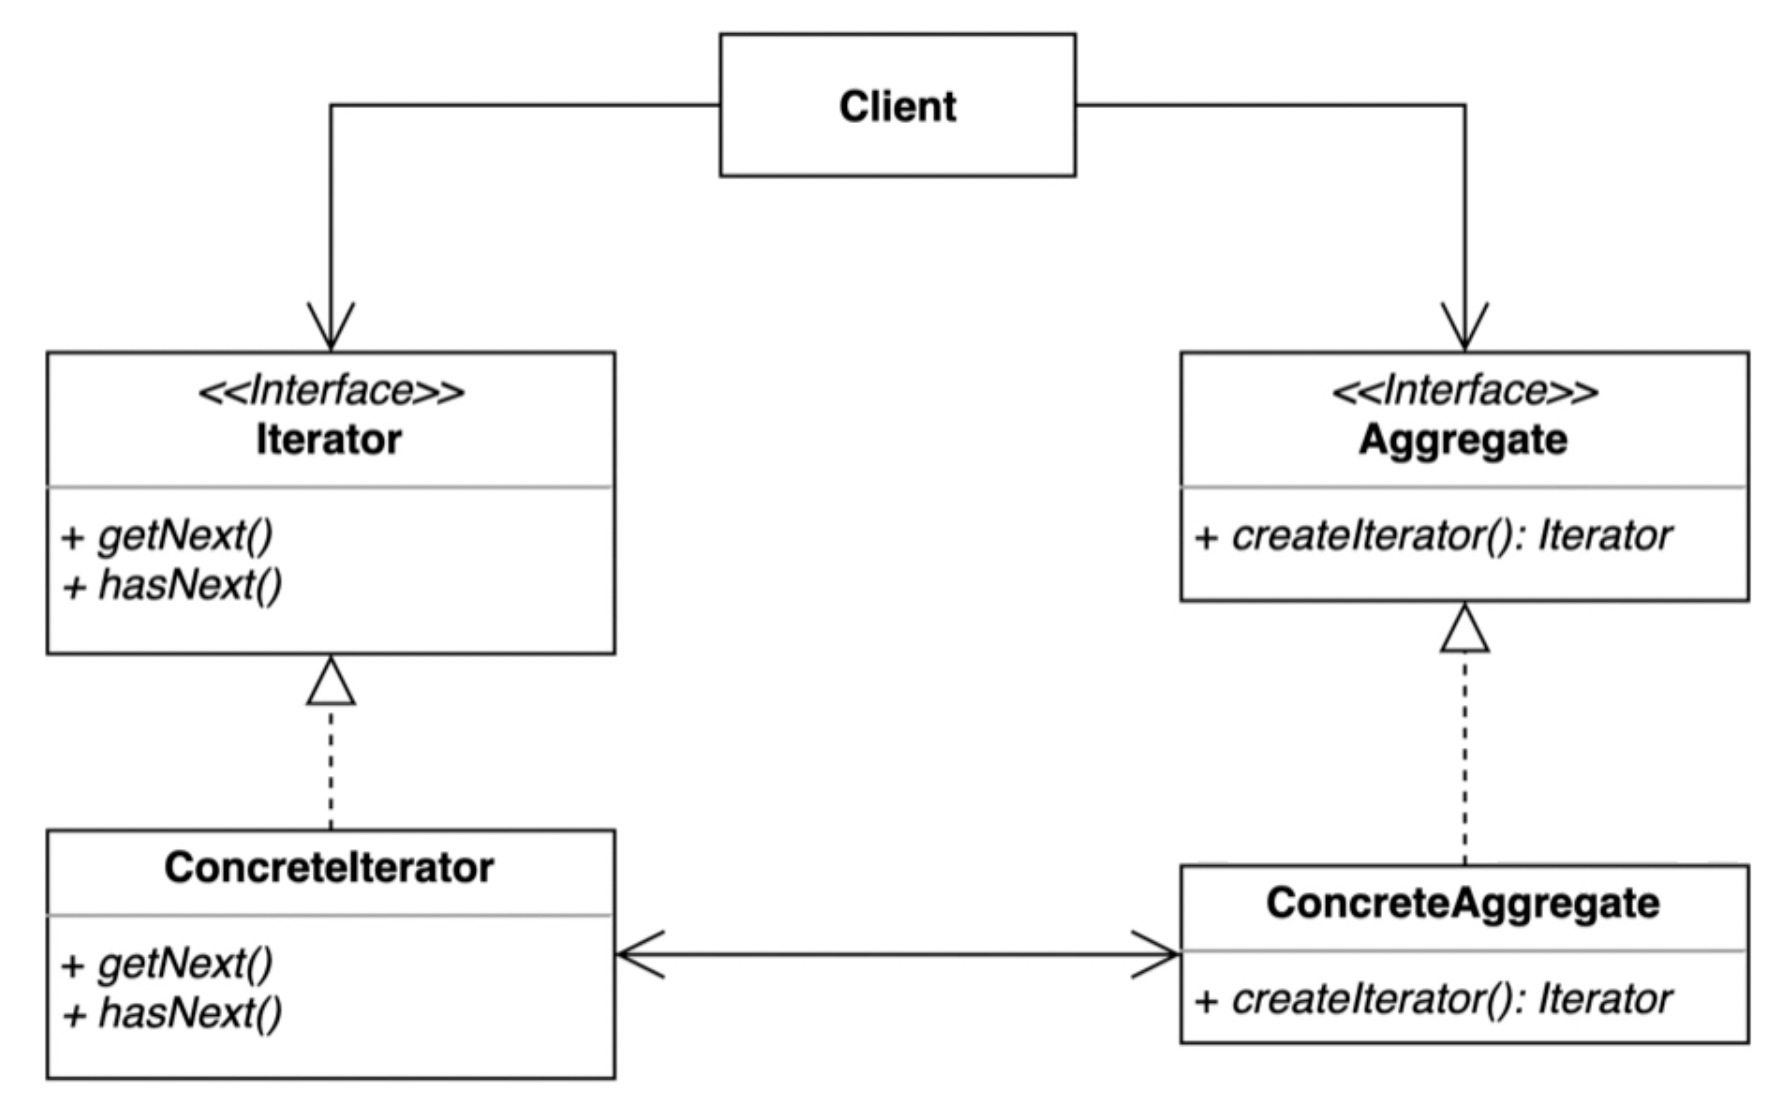
Iterator Pattern 의 장점은, 집합 객체의 구조를 알지 못해도 순회가 가능하다는 것이다.
이것도 읽어보세요
