[ReactiveX] RxJS
본 블로그 글에서는 반응형 프로그래밍의 핵심인 RxJS를 소개하고, Observable, Operator, Observer 등의 구성 요소와 다양한 활용법을 자세히 설명합니다.
Contents
- Observable
- Observer
- Operator
- 선택 관련 Operator
- Transformation 연산자들
- 시간 관련 Operator
- 시간을 다루는 심화 연산자들
- 스트림 결합 Operator
- 기타 유용한 연산자들
- 반응형 프로그래밍, 함수형 프로그래밍, 선언형 프로그래밍 위의 새 프로그래밍 패러다임은 명칭은 다르지만, 같이 쓰이기 좋다. 함수형 프로그래밍은 순수 함수들을 조합하여 데이터를 처리한다. 반응형 프로그래밍에서는 Stream 을 선언한 뒤, Stream 에 데이터가 들어가면 어떻게 처리할지를 선언하면, Stream 내부의 데이터들이 가공되어 연산된다. Stream 내부의 데이터를 가공/변화하는데 초점이 맞춰져 있기 때문에, Stream 내부의 Operator 들은 필연적으로 순수 함수여야 한다. 따라서, 올바른 반응형 프로그래밍을 구현하다 보면 자연스럽게 함수형 프로그래밍을 하게 된다.
ReactiveX 의 구성요소들 ReactiveX 는 크게 세 가지 항목으로 구성된다.
Observable 로직을 데이터와 연산으로 나누어 볼 때, 데이터 부분으로 이해할 수도 있다. Stream 이라고 이해하면 편하다.
Operator Observable 들을 처리해 줄 연산자들. 주로 순수함수의 성격을 띈다.
Observer Observable 들을 관찰하고 있다가, 연산해야 하는 상황이 되면 알려주는 주체이다.
위의 항목들은 일반적인 함수형 프로그래밍에서도 가능한데, 왜 Reactive 프로그래밍을 하는 걸까 ? ReactiveX 는 단순한 데이터 뿐만 아니라 시간의 흐름, 사용자의 동작, 네트워크 요청의 결과까지 Stream 으로 만들어서 파이프라인에 흘려보내 처리할 수 있다.
const { interval } = rxjs;
const { ajax } = rxjs.ajax
const { filter, take, map, delay } = rxjs.operators;

// setInterval
interval(500).pipe(
    filter(n => n%2 === 0),
    take(5),
    map(n => Math.pow(2)),
);
// 유저의 클릭 이벤트
fromEvent(document, "click").pipe(
    map(e => e.x),
    filter(x => x < 400),
    take(4),
);
// AJAX
ajax("http://abcd.com").pipe(
    map(result => result.response.first_name)
).subscribe(console.log);

// delay
fromEvent(document, "click").pipe(
    // 1 초간 Delay 시킨다
    delay(1000),
    // 0.5초간 추가적은 input 이 없으면, 발행시킨다.
    debounceTime(500),
);
- 반응형 프로그래밍은 Stream 의 데이터를 연산하는 것이기 때문에, 반응형 프로그래밍을 잘 하려면 비즈니스 로직들을 Stream 의 흐름으로 재해석할 수 있어야 한다.
Observable
Convention : Observable 변수는 변수 뒤에 $ 를 붙인다.
- Collection 관련
const { of, from, range, generate } = rxjs

const obs1$ = of(1, 2, 3, 4, 5)
const obs2$ = from([6, 7, 8, 9, 10])
const obs3$ = range(11, 5)
const obs4$ = generate(
  15, x => x < 30, x => x + 2
)

//obs1$.subscribe(item => console.log(`of: ${item}`))
//obs2$.subscribe(item => console.log(`from: ${item}`))
//obs3$.subscribe(item => console.log(`range: ${item}`))
//obs4$.subscribe(item => console.log(`generate: ${item}`))
- 시간 관련
const { interval, timer } = rxjs

const obs1$ = interval(1000)
const obs2$ = timer(3000)

//obs1$.subscribe(item => console.log(`interval: ${item}`))
//obs2$.subscribe(item => console.log(`timer: ${item}`))
- DOM Event 관련
const { fromEvent } = rxjs

const obs1$ = fromEvent(document, 'click')
const obs2$ = fromEvent(document.getElementById('myInput'), 'keypress')

obs1$.subscribe(item => console.log(item))
obs2$.subscribe(item => console.log(item))
- Ajax 관련
const { ajax } = rxjs.ajax

const obs$ = ajax(`http://127.0.0.1:3000/people/1`)
obs$.subscribe(result => console.log(result.response))
- 직접 Observable 생성
const { Observable } = rxjs

const obs$ = new Observable(subscriber => {
  subscriber.next(1)
  subscriber.next(2)
  subscriber.next(3)

  // 값을 다 발행한 뒤에는 compelte를 실행하여 메모리 해제
  subscriber.complete()
})

obs$.subscribe(item => console.log(item))
- Observable 은 Lazy 하다 아무도 Subscribe 하지 않으면, Observable 은 동작하지 않는다.
Observer
Observer 은 크게 다음과 같은 구조로 설정된다.
const observer = {
    // Operator
    next: Function,
    // Error Handler
    error: Function,
    // When Stream Terminates
    complete: Function,
}
// Object 를 넘겨주면서 subscribe 가능
observable$.subscribe(observer)
// Object 형태가 아니라, 다음과 같이도 subscribe 가능
// (error, complete) 는 생략 가능
observable$.subscribe(next, error, complete)
중간에 에러가 발생한다면, Operator 은 동작을 멈추고 중단된다.
import { Observable } from "rxjs";

const observable$ = new Observable((subscriber) => {
  subscriber.next(1);
  subscriber.next(2);
  throw new Error("test");
  subscriber.next(3);
  subscriber.complete();
});

observable$.subscribe({
  next: console.log,
  error: console.error,
  complete: console.log,
});
// 실행해 보면, Stream 2 이후로는 실행되지 않는다.
Observable 이 Complete 된다면, 그 이후의 next 는 실행되지 않는다.
import { Observable } from "rxjs";

const observable$ = new Observable((subscriber) => {
  subscriber.next(1);
  subscriber.next(2);
  subscriber.complete();
  subscriber.next(3);
});

observable$.subscribe({
  next: console.log,
  error: console.error,
  complete: console.log,
});
// 1, 2 만 출력된다.
사용이 다 된 Observable 은 complete 시켜야 메모리가 낭비되지 않는다. 중간에 구독을 멈추려면 unsubscribe() 를 실행시켜야 한다.
Operator
- Creation Operator Observable 을 생성
of, from, range, fromEvent, timeout, interval
- Pipable Operator Observable 의 데이터를 순수 함수로 가공 (Observable의 데이터를 수정하지 않음. Immutable) Operator 목록 (공식 문서)
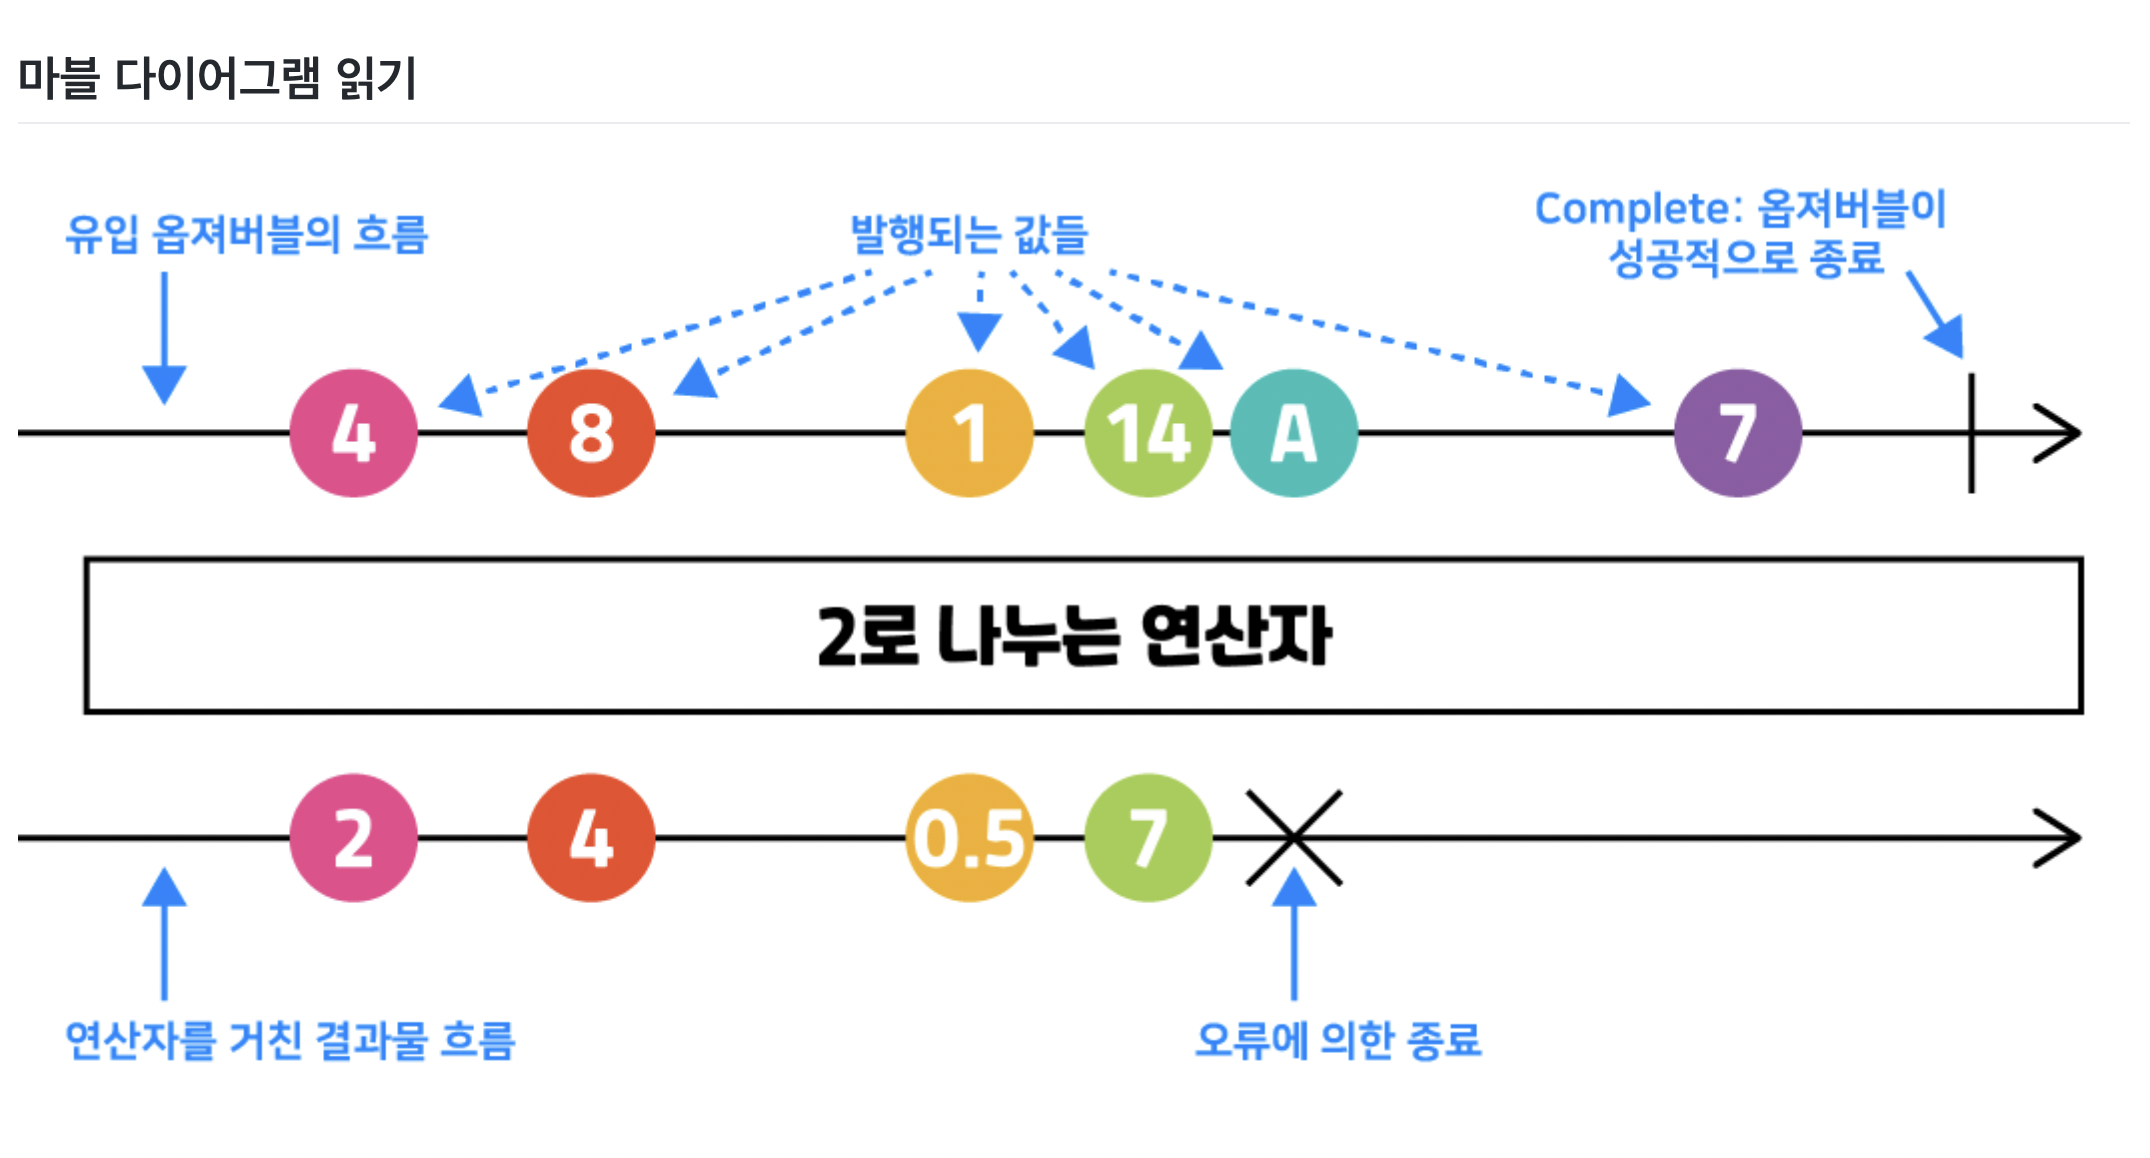
Marvel Diagram 읽는 법
선택 관련 Operator
const { from } = rxjs
const { first, last, elementAt, filter, distinct } = rxjs.operators

const obs$ = from([
    9, 3, 10, 5, 1, 10, 9, 9, 1, 4, 1, 8, 6, 2, 7, 2, 5, 5, 10, 2
]);

obs$.pipe(first()).subscribe(x => console.log('first: ' + x));
obs$.pipe(last()).subscribe(x => console.log('last: ' + x));
obs$.pipe(elementAt(5)).subscribe(x => console.log('elementAt: ' + x));
obs$.pipe(distinct()).subscribe(x => console.log('distinct: ' + x));
obs$.pipe(
    filter(x => x % 2 === 1)
).subscribe(x => console.log('filter: ' + x));
- tab 통과되는 모든 값마다 특정 작업을 수행 ⭐ 발행 결과에 영향을 주지 않음
const { from } = rxjs
const { tap, filter, distinct } = rxjs.operators

from([
    9, 3, 10, 5, 1, 10, 9, 9, 1, 4, 1, 8, 6, 2, 7, 2, 5, 5, 10, 2
]).pipe(
    tap(x => console.log('-------------- 처음 탭: ' + x)),
    filter(x => x % 2 === 0),
    tap(x => console.log('--------- 필터 후: ' + x)),
    distinct(),
    tap(x => console.log('중복 제거 후: ' + x)),
).subscribe(x => console.log('발행물: ' + x))
Transformation 연산자들
- pluck
const { from } = rxjs
const { pluck } = rxjs.operators

const obs$ = from([
    { name: 'apple', price: 1200, info: { category: 'fruit' } },
    { name: 'carrot', price: 800, info: { category: 'vegetable' } },
    { name: 'pork', price: 5000, info: { category: 'meet' } },
    { name: 'milk', price: 2400, info: { category: 'drink' } }
]);

obs$.pipe(
    // pluck 연산자는 특정 항목만 뽑아준다.
    pluck('price')
).subscribe(console.log);

obs$.pipe(
    pluck('info'),
    pluck('category'),
).subscribe(console.log);

obs$.pipe(
    pluck('info', 'category')
).subscribe(console.log);

const obs$ = ajax(`http://api.github.com/search/users?q=user:mojombo`).pipe(
    // 배열이 끼어있는 경우, number 값을 입력해 주면 index 로 이해하고 분해해준다.
    pluck('response', 'items', 0, 'html_url')
)
obs$.subscribe(console.log);
- toArray
// toArray
// 그냥 subscribe 하면 하나씩 값으로 나오지만, toArray() 를 사용하면 전체 결과가 하나의 list 로 나오게 된다.
range(1, 10).pipe(
    filter(x => x % 3 === 0),
    filter(x => x % 2 === 1),
    toArray()
).subscribe(console.log)
// [3, 9]```
// scan e 는 모든 연산이 끝난 결과를 반환해 주지만,
// reduce 는 모든 연산이 끝난 결과를 반환해 주지만,
// scan 은 연산 과정을 모두 출력해 준다.
const obs$ = of(1,2,3,4,5);
obs$.pipe( cv) => ac + cv)
    scan((ac, cv) => ac + cv)
).subscribe(console.log);
- zip 지퍼처럼 두 스트림을 같은 index끼리 묶어준다. 만약 두 스트림의 길이가 다르다면, 두 스트림 중 길이가 짧은 스트림의 갯수에 맞춘다.
const obs1$ = from([1, 2, 3, 4, 5, 6])
const obs2$ = from(['a', 'b', 'c', 'd', 'e'])

zip(obs1$, obs2$).subscribe(console.log)
// [1, "a"]
// [2, "b"]
// [3, "c"]
// [4, "d"]
// [5, "e"]
// zip 응용 예시
const obs4$ = interval(1000)
const obs5$ = fromEvent(document, 'click').pipe(pluck('x'))

zip(obs4$, obs5$).subscribe(console.log)
어떻게 동작할까 ?
만약 클릭수가 경과한 초보다 많다면 : 1초마다 하나씩 zip stream 에서 하나씩 발행된다.
만약 클릭보다 경과한 초가 더 많다면 : 클릭할 때마다 zip stream 에서 하나씩 발행된다.
- take와 skip interval(), fromEvent() 스트림은 별다른 조건이 없으면 무한대로 발행된다. 이를 제한하기 위한 쉬운 방법으로 take, skip 이 있다.
fromEvent(document, 'click').pipe(
    pluck('x'),
    filter(x => x < 200),
    take(5),
).subscribe(
    console.log,
    err => console.error(err),
    _ => console.log('COMPLETE')
)
- takeWhile 특정한 조건에 부합할 때에만 계속해서 Stream 을 입력받는다. (~하는 동안에만 선택)
fromEvent(document, 'click').pipe(
    pluck('x'),
    takeWhile(x => x < 200),
).subscribe(
    console.log,
    err => console.error(err),
    _ => console.log('COMPLETE')
)
위의 예시에서, x 좌표가 200보다 큰 부분들은 아무리 클릭해도 발행되지 않는다. x좌표가 200보다 작은 이벤트 5건만 잡아서 발행되는 스트림이 생성된다.
takeUntil 은 또다른 Stream 을 인자로 받는다. 인자로 받은 Stream 이 첫 번째 값을 발행할 때 까지만 값을 발행한다.
obs1$ = fromEvent(document, 'click')
obs2$ = timer(5000)

obs1$.pipe(
    pluck('x'),
    takeUntil(obs2$)
).subscribe(
    console.log,
    err => console.error(err),
    _ => console.log('COMPLETE')
)
위의 예시는 첫 5초동안만 클릭 이벤트를 입력받고, 5초가 지나면 Complete 시킨다.
skip, skipLast, skipWhile, skipUntil 도 take 와 의미만 반대인 상태이고 동작은 유사하다.
시간 관련 Operator
- delay 각 이벤트의 발행 시점을 미뤄준다.
interval(1000).pipe(
    take(5),
    tap(x => console.log(x + ' 발행시작')),
    delay(1500)
).subscribe(x => console.log(x + ' 발행완료'))
- timeInterval 이전 발행과의 시간차를 보여준다.
fromEvent(document, 'click').pipe(
    pluck('x'),
    timeInterval()
).subscribe(console.log)
/*
{
    interval: 1402,
    value: 149
}
*/
- timeOut timeout 은 일정 시간이 지났을 때에 발행되지 않으면, 에러를 발생시킨다.
fromEvent(document, "click").pipe(
    timeout(3000)
).subscribe(
    _ => console.log("OK"),
    err => console.error(err),
)
- timeOutWith timeoutWith 는 일정 시간동안 발행되지 않으면, 다른 observable 을 발행한다.
ajax('http://127.0.0.1:3000/people/name/random').pipe(
    pluck('response'),
    timeoutWith(500, of({
        id: 0,
        first_name: 'Hong',
        last_name: 'Gildong',
        role: 'substitute'
    }))
).subscribe(console.log, console.error)
시간을 다루는 심화 연산자들
- debounceTime debounceTime 은 어떠한 값이 발행되고 난 후, 일정 시간 내에 또 발행되려 한다면, 이전에 발행된 값이 발행되게 된다.
const { debounceTime } = rxjs.operators

clicks$.pipe(
    debounceTime(1000)
).subscribe(x => console.log('OUTPUT: -------- ' + x))
 유저의 키보드 input 을 받을 때, 사용자로부터 너무 잦은 input 이 있을 때, debounceTime 을 활용하면 적절하다.
- auditTime auditTime 은 어떠한 값이 들어온 후, 특정 시간이 지나면 가장 최근의 발행값을 발행한다.
const { auditTime } = rxjs.operators

clicks$.pipe(
    auditTime(1000)
).subscribe(x => console.log('OUTPUT: -------- ' + x))
// 첫번째 클릭으로부터 1초 후를 기준으로, 가장 최근에 들어온 input 값으로 발행된다.

- throttleTime throttleTime 은 특정 시간 간격으로 발행시키며, 옵션 값으로 가장 앞의 값을 발행시킬지, 가장 뒤의 값을 발행시킬지 정할 수 있다.
const { throttleTime } = rxjs.operators

clicks$.pipe(
    throttleTime(1000, undefined, {
        leading: true, trailing: false
    })
).subscribe(x => console.log('OUTPUT: -------- ' + x))

// 클릭하자마자 발행된다. 발행된 후 1초가 지나기 전까진, 다른 값들이 발행되지 않는다.
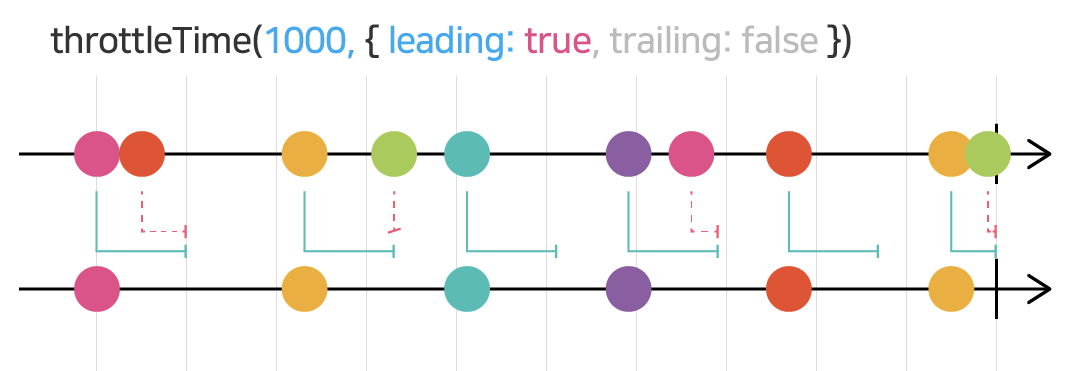
const { throttleTime } = rxjs.operators

clicks$.pipe(
    throttleTime(1000, undefined, {
        leading: false, trailing: true
    })
).subscribe(x => console.log('OUTPUT: -------- ' + x))
// 1초 간격을 기다렸다가 발행한다.
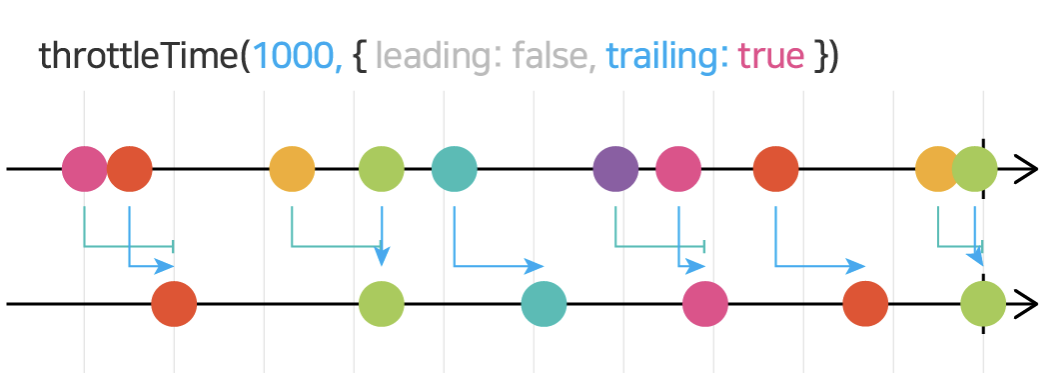
스트림 결합 Operator
- merge merge 는 단순히 복수개의 observable 을 하나로 합쳐준다. 아래의 예시는 1초 간격 + 클릭이벤트가 발생할 때마다 발행한다.
const interval$ = interval(1000).pipe(map(_ => "interval"));
const click$ = fromEvent(document, "click").pipe(map(_ => "click"));

merge(interval$, click$).subscribe(console.log);
const { merge, interval } = rxjs
const { map, take } = rxjs.operators

const intv1$ = interval(1000).pipe(
    map(_ => 'INTERVAL 1'), take(3))
const intv2$ = interval(1000).pipe(
    map(_ => 'INTERVAL 2'), take(6))
const intv3$ = interval(1000).pipe(
    map(_ => 'INTERVAL 3'), take(9))
const intv4$ = interval(1000).pipe(
    map(_ => 'INTERVAL 4'), take(9))
const intv5$ = interval(1000).pipe(
    map(_ => 'INTERVAL 5'), take(9))

// merge 함수의 마지막 인자로 number 를 주게 되면,
// 한 번에 몇 개씩 합칠지 나타낸다.
// 위의 예시로는 INTERVAL (1,2,3) 이 먼저 발행되다가,
// (1,2,3) => (2,3,4) => (3,4,5) => (4,5) => (5) 의 형태로 발행된다.
merge(intv1$, intv2$, intv3$, intv4$, intv5$, 3)
.subscribe(console.log)
- concat concat 은 스트림을 이어붙여준다.
const intv1$ = interval(1000).pipe(
    map(_ => "INTERVAL 1"),
    take(3),
);
const intv2$ = interval(1000).pipe(
    map(_ => "INTERVAL 2"),
    take(3),
);
const intv3$ = interval(1000).pipe(
    map(_ => "INTERVAL 3"),
    take(3),
);

concat(intv1$, intv2$, intv3$)
    .subscribe(console.log);

// INTERVAL 1 => 2 => 3 이 각각 3회씩 반복되어서 발행된다.
const interval$ = interval(1000).pipe(
    map(_ => "interval"),
    take(5),
);
const click$ = fromEvent(document, "click").pipe(
    map(_ => "click")
);

concat(interval$, click$).subscribe(console.log);

// interval 이 동작하고 있을 때에는,
// click 이벤트 스트림 자체가 동작하지 않는다.
// (interval 을 subscribe 중일 때에는, click 스트림은 동작하지 않는다.)
- mergeMap
mergeMap 은 하나의 Stream 으로부터 다른 Stream 이 생성될 때,
그 stream 을 map 함수처럼 한 stream 으로 합쳐준다.
동시에 여러 요청을 concurrent 하게 날리고 싶다면, mergeMap 의 두 번째 인자로 숫자를 넘겨주면 된다.
mergeMap(e => interval(1000)).pipe(
        take(5)
    )
).subscribe(console.log);
// 위의 예제는 클릭할 때마다,
// 1초에 한번씩 이벤트가 발행되는 Stream 을 생성한다.
of(1, 2, 3, 4, 5).pipe(
    mergeMap(keyword => ajax(
            `localhost:3000/people/${keyword}`
        ).pipe(
            pluck("response", "first_name")
        )
    )
).subscribe(console.log);
// 위의 예제는 ajax 요청을 5회 실시한 뒤에,
// first_name 을 뽑아서 발행해준다.
- concatMap concatMap 은 복수개의 Stream 을 이어붙인 후, map 함수를 실행시켜 준다.
of(1, 2, 3, 4, 5).pipe(
    concatMap(keyword => ajax(
            `localhost:3000/people/${keyword}`
        ).pipe(
            pluck("response", "first_name")
        )
    )
).subscribe(console.log);
// mergeMap 과는 달리,
// concatMap 을 사용하면 항상 이름이 순서대로 출력되게 된다.
- switchMap 기준 스트림이 새 값을 발행하면 진행중이던 스트림을 멈춤
fromEvent(document, 'click').pipe(
    switchMap(e => interval(1000).pipe(
        map(i => e.x + ' : ' + i),
        take(5)
    ))
).subscribe(console.log)
// 클릭할 때마다, 과거에 있던 stream 은 삭제되게 된다.
기타 유용한 연산자들
- sequenceEqual 타이밍에 관계없이, 두 스트림 발행물들의 순서와 값 동일여부 반환 유저가 일련의 문자열을 입력하는 것을 기다릴 때 사용할 수 있다. 아래의 예시는 유저가 3147582 를 입력했는지를 확인할 수 있다.
const num$ = from([3, 1, 4, 7, 5, 8, 2]);
const key$ = fromEvent(document, "keyup").pipe(
    map(e => Number(e.code.replace("Digit", ""))),
    take(7),
    sequenceEqual(num$),
).subscribe(console.log);
- distinctUntilChanged Stream 의 값을 보고 있다가, 변화가 생기면 그 때 발행해준다. (연속으로 2번 이상 같은 값이 나오는 것을 방지해 준다.) 아래의 예시에서, 값은 1 => 2 => 1 => 2 => 3 => 4 => 1 의 순서로 변화하므로, 위의 순서대로 발행된다.
of(1,1,2,2,2,1,1,2,3,3,3,4,4,1).pipe(
    distinctUntilChanged(),
).subscribe(console.log);
distinctUntilChange 는 Object 도 비교할 수 있다. (같은 이름이면, 같은 Object 라고 판단하는 예)
distinctUntilChanged((a, b) => a.name === b.name)
- combineLatest
한 스트림에서 값이 발행될 때, 다른 스트림의 마지막 값과 매칭해서 값을 발행해 준다.
zip 은 항상 두 스트림을 일대일 대응하였지만, combineLatest 는 발행된 가장 최신 값을 항상 매칭해 준다.
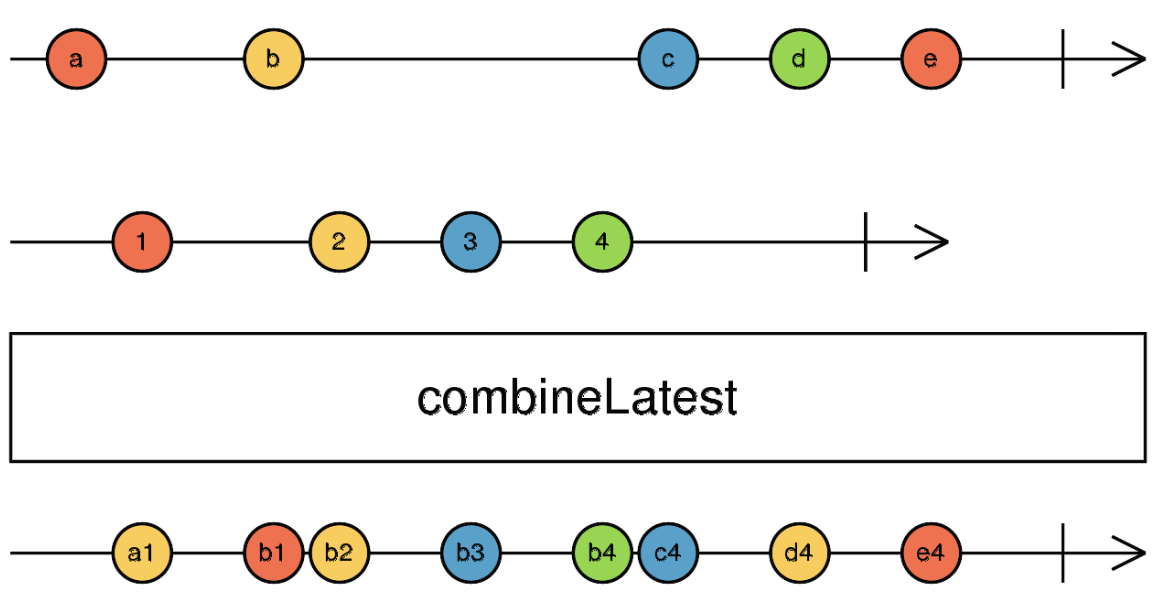
combineLatest(
    fromEvent(document, "click"),
    interval(1000).pipe(pluck("x")),
).subscribe(console.log);
- buffer
인자로 받은 스트림이 발행될 때마다 스트림을 끊어서 내보낸다. 부모 Stream 은 계속 모아놓았다가, 자식 스트림이 발행될 때 배열 형태로 내보내진다.
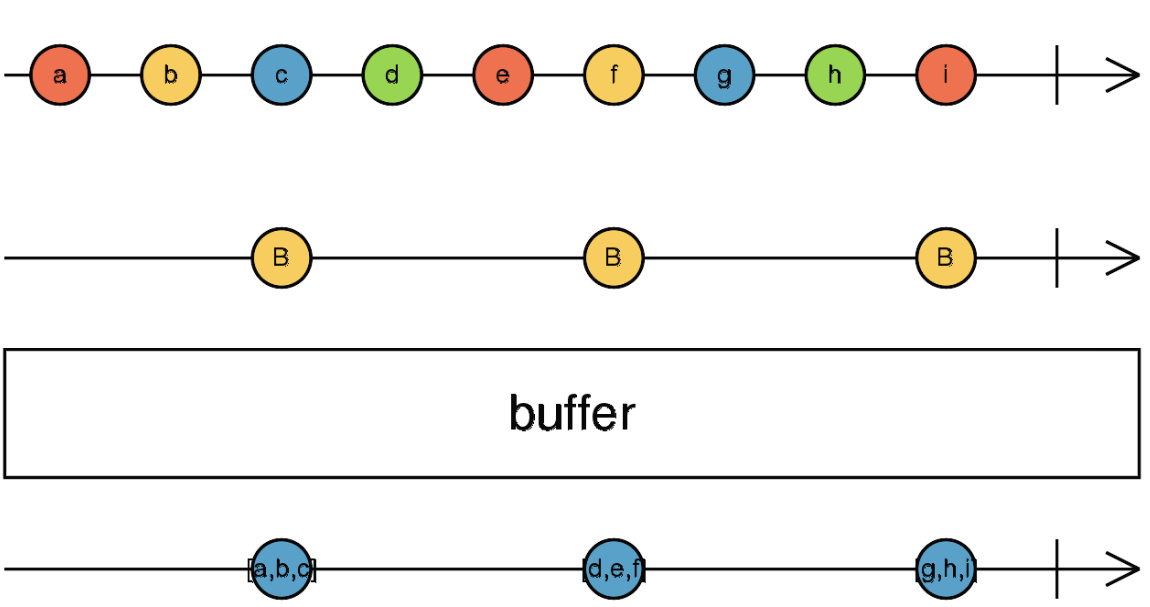
interval(1000).pipe(
    buffer(fromEvent(document, "click"))
).subscribe(console.log);
- bufferCount
n의 개수가 버퍼에 찰 때마다 내보내 준다.
아래의 예시는 3번 클릭할 때마다 발행해주는 Stream 이다.
ex.
알림톡을 10개씩 묶어서 한 번씩 전송 요청을 날릴 때 유용하게 쓰일 수 있다.
fromEvent(document, "click").pipe(
    bufferCount(3)
).subscribe(_ => console.log("Clicked 3 Times"));
- groupBy Stream 을 특정한 기준으로 묶어서 발행해 준다. Lodash 의 groupBy 와 비슷한 느낌. groupBy 를 하고 나면 결과물로 Stream 들의 interable이 반환됨을 알아야 한다.
range(1, 50).pipe(
    groupBy(x => x%3),
    mergeMap(groups$ => groups$.pipe(toArray())),
).subscribe(console.log);
- startWith, endWith Stream 의 시작부분, 끝부분에 원소를 추가해 준다.
const obs$ = of(1,2,3);
// -1, 0, 1, 2, 3
obs$.pipe(startWith(-1, 0)).subscribe(console.log);
// 1, 2, 3, 4, 5
obs$.pipe(endWith(4, 5)).subscribe(console.log);
- defaultIfEmpty 빈 값이 발행될 경우, Default 값을 설정해 줄 수 있다. 아래의 예시는 5초동안 클릭이 있다면 이를 발행하고, 없다면 NO CLICK 을 발행한다.
fromEvent(document, "click").pipe(
    takeUntil(timer(5000)),
    pluck("x"),
    defaultIfEmpty("NO CLICK")
).subscribe(console.log)
- retry Operator 들이 연산을 수행하다 에러가 나면, 몇번 재시도할지 결정한다.
range(1, 20).pipe(
    mergeMap(keyword => ajax(`localhost:3000/${keyword}`)).pipe(
        pluck("response", "first_name"),
        retry(3),
    )
).subscribe(console.log);
- defer 조건에 따른 스트림 발행 구독하는 순간에 조건에 따른 스트림을 생성 💡 옵저버블이 해당 코드가 실행되는 부분시점에서 생성되기 때문에 당시의 상태에 따라 만들어질 옵저버블이 결정되도록 할 수 있습니다.
fromEvent(document.querySelector("#checked"), "change").pipe(
    pluck("target", "checked")
).subscribe(checked => {
    defer(_ => checked ? of("CHECKED") : of("UNCHECKED")).subscribe(console.log);
})
- empty Stream 으로 처리하고 싶은데, 아무런 값도 발행하고 싶지 않을 때 사용한다.
empty().subscribe(console.log, console.error, _ => console.log("COMPLETE"));
- throwError Stream 으로 처리하고 싶은데, 에러를 발생시켜야 할 때 사용한다.
throwError().subscribe(console.log, console.error, _ => console.log("COMPLETE"));
- share
Observable 을 Subject 처럼 만들어 준다. (여러 구독자 간 Stream 을 공유시킨다.)
아래의 예시에서, share 이 없었다면 두 개의 별개의 Stream 이 생성되겠지만, share 을 포함시키면 한 개의 Stream 으로 공유한다.
또한, share 을 실행하면 tap 도 한 번만 실행된다.
Observable(Unicast) 을 Subject(Multicast) 와 같은 형식으로 사용하고 싶을 때 유용하게 사용된다.
const obs$ = interval(1000).pipe(
    take(20),
    // share 을 사용하면, side effect 도 한 번만 실행된다.
    tap(e => console.log("side effect : " + e)),
    share()
);
obs$.subscribe(console.log);
setTimeout(_ => obs$.subscribe(console.log), 2000);
- Subject
- Observable
- 누군가 구독을 해야 발행 시작
- 각 구독자에게 따로따로 발행
- unicast
- cold 발행 (각 구독자가 구독을 시작하고 싶을 때 시작한다. Netflix)
- Subject
- 개발자가 원하는 때에 발행
- 모든 구독자에게 똑같이 발행
- multicast
- hot 발행 (모든 구독자들이 똑같은 구독을 제공받는다. TV)
- Observable
// Observable 은 구독자가 구독할 때 각각의 데이터가 발행되지만,
// Subject 는 모든 구독자에게 같은 데이터가 발행된다.
const {Subject} = rxjs;
const subject = new Subject();

setTimeout(() => {
    let x = 0;
  setInterval(() => {
        subject.next(x++);
  }, 2000)
})

subject.subscribe(x => console.log("바로 구독 : " + x));
setTimeout(() => {
    subject.subscribe(x => console.log("3초 후 구독 : " + x));
}, 3000)
setTimeout(() => {
    subject.subscribe(x => console.log("7초 후 구독 : " + x));
}, 7000)
- BehaviorSubject 초기에 Default 값을 부여할 수 있고, subscribe 하면 전에 세팅된 값을 먼저 발행받게 된다.
const {BehaviorSubject} = rxjs;
const subject = new BehaviorSubject(0);

subject.subscribe(x => console.log(`A : ${x}`));

subject.next(1);
subject.next(2);
subject.next(3);

subject.subscribe(x => console.log(`B : ${x}`));

subject.next(4);
subject.next(5);
subject.next(6);

/*
"A : 0"
"A : 1"
"A : 2"
"A : 3"
"B : 3"
"A : 4"
"B : 4"
"A : 5"
"B : 5"
"A : 6"
"B : 6"
*/
- ReplaySubject 마지막 N개 값을 저장 후 추가 구독자에게 발행
const { ReplaySubject } = rxjs
const subject = new ReplaySubject(3) // 마지막 3개 값 저장

subject.subscribe((x) => console.log('A: ' + x))

subject.next(1)
subject.next(2)
subject.next(3)
subject.next(4)
subject.next(5)

subject.subscribe((x) => console.log('B: ' + x))

subject.next(6)
subject.next(7)
/*
"A: 1"
"A: 2"
"A: 3"
"A: 4"
"A: 5"
"B: 3"
"B: 4"
"B: 5"
"A: 6"
"B: 6"
"A: 7"
"B: 7"
*/
- AsyncSubject Complete 후의 마지막 값만 발행
const { AsyncSubject } = rxjs
const subject = new AsyncSubject()

subject.subscribe((x) => console.log('A: ' + x))

subject.next(1)
subject.next(2)
subject.next(3)

subject.subscribe((x) => console.log('B: ' + x))

subject.next(4)
subject.next(5)

subject.subscribe((x) => console.log('C: ' + x))

subject.next(6)
subject.next(7)
subject.complete()
이것도 읽어보세요